
TE Tuner and Metronome User Guide
For Android and Desktop
Table of Contents
- Practice Streaks
- TE Tuner
- TE String Tuner
- TE Metronome
- Using and accessing the Metronome from other pages
- Setting Tempo
- Beat Chooser
- Meter
- Subdivision
- Tempo Options
- Volume
- Visual Flash
- Accent
- Sound
- Preserve 8th Note Durations
- List Button
- Preset Sequence
- Metronome Assistant
- Count-In
- Metronome Animated Display
- Metronome Options
- Ableton Link
- BodyBeat Pulse Mode
- Metronome Presets
- Sequencing and Looping
- Metronome Preset Options
- Metronome Preset Groups
- Preset Groups Editor
- Presets List Editor
- TE Tone Generator (Sound Page)
- TE Analysis
- Sound Level Mixer
- TE File Recording and Playback
- TE Custom View
- TE Preferences
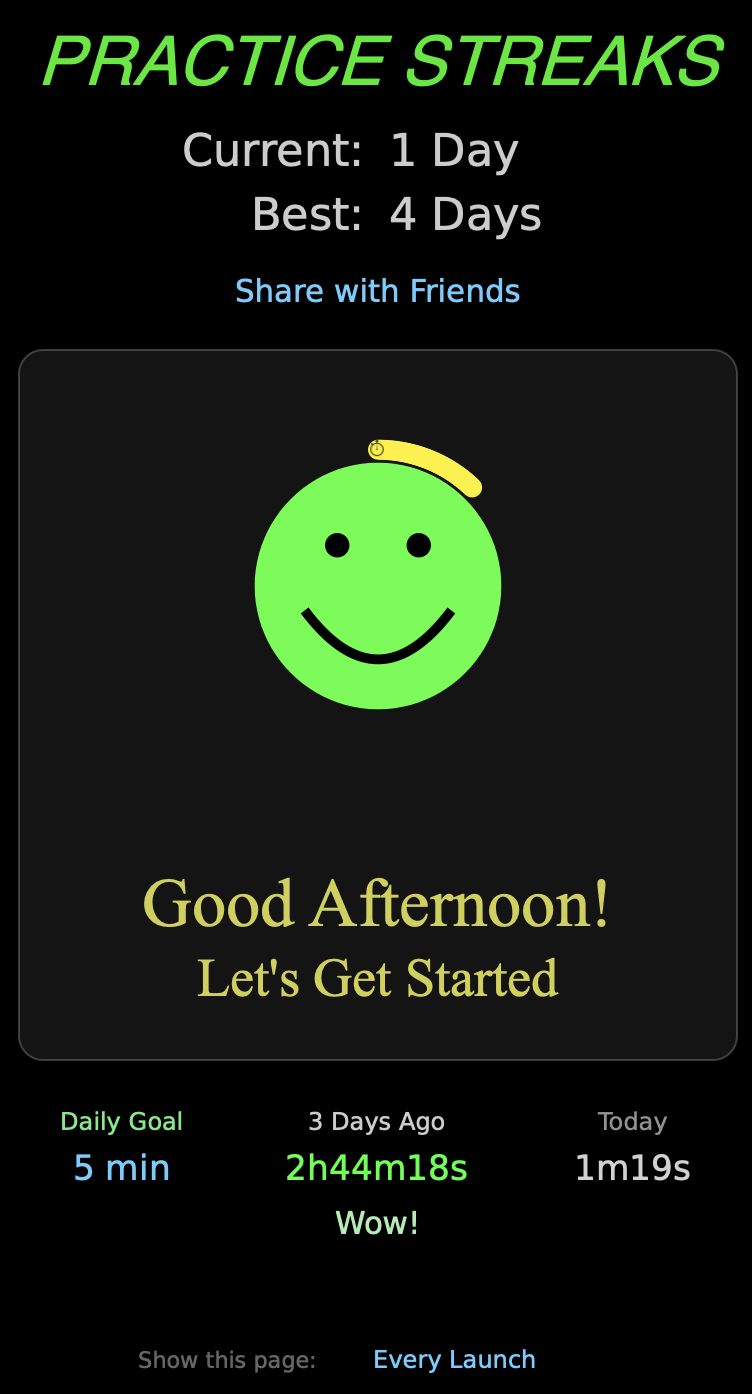
Practice Streaks
Welcome to the TonalEnergy Tuner (TET). This page gives an overview of your practice sessions.
Current: How many days in a row you’ve opened the app.
Best: Your longest practice streak.
Share with Friends: Tap to share your practice streaks.
Coloured rings around the smiley face: Check the Activity Page for a complete explanation of each ring, and how to set goals.
Tapping anywhere in the smiley face area will take you into the app.
Daily Goal: Tap to set your daily practice time goal.
Yesterday / days ago: How long you used the app previously.
Today: How long you’ve used the app today.
Calendar Button: Takes you to the Activity Page.
Show this page: Allows you to select how often this page will be displayed. Choices are:
- Every Launch
- Once a Day
- Once a Week
- Never
TE Tuner
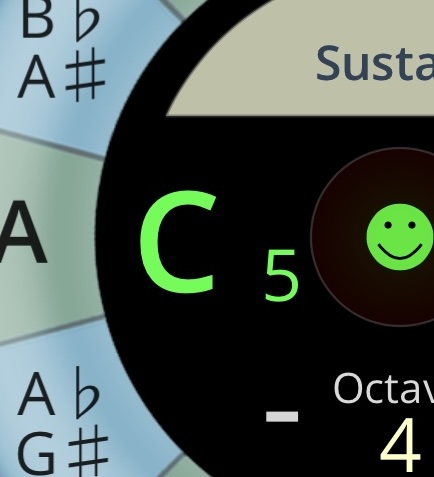
Target Tuner
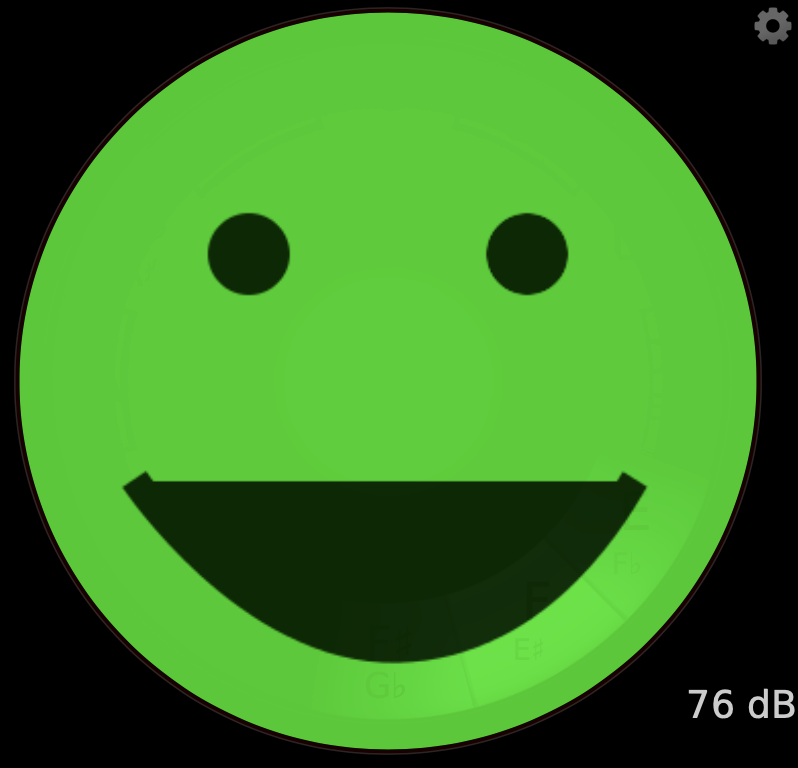
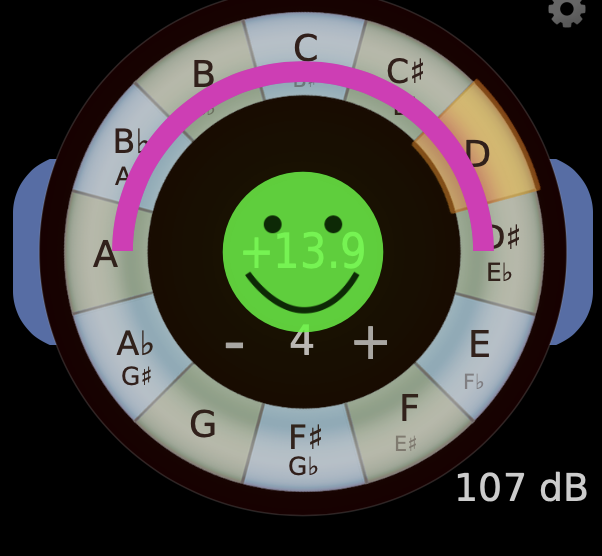
Green smiley face: shows when your note is in tune. It gets bigger when you stay in tune for an extended period.
Colored half circles: above the center show the note is sharp, while below the center show the note is flat.

Purple puzzled face: shows when your pitch is out of tune.

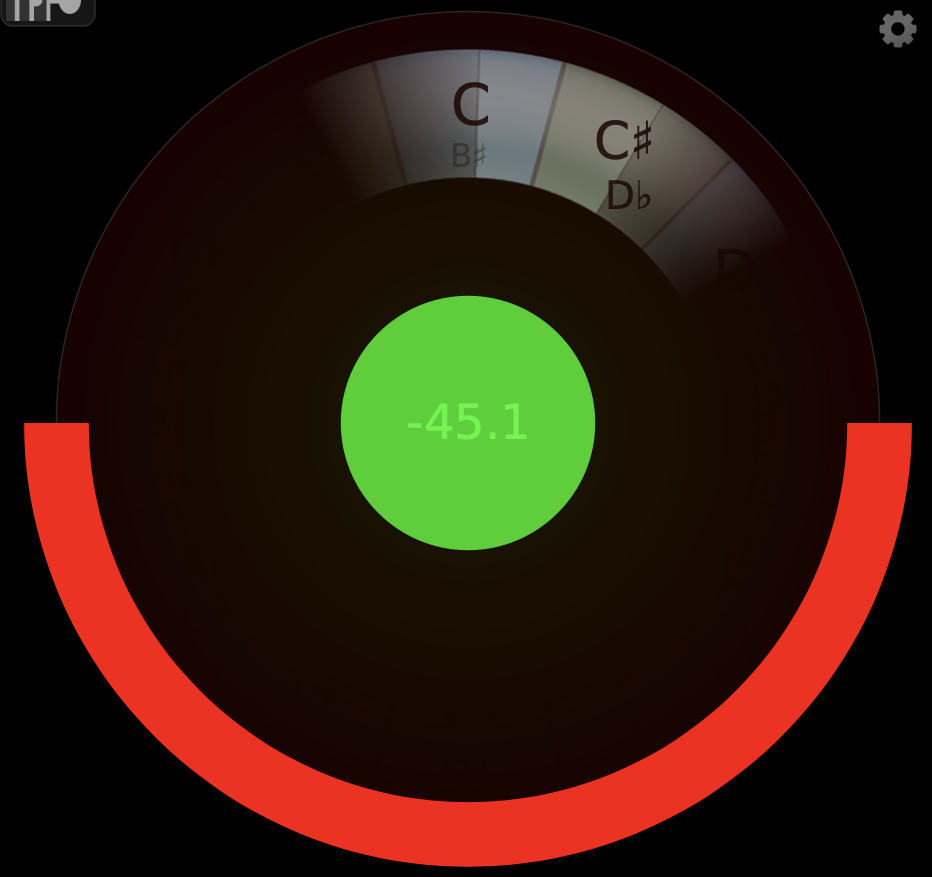
Cent Meter: shows your tuning in cents (1 / 100ths of a semitone). See Cent Display for more detail.
Mode and Range: TE Tuner reacts differently to different instruments. Tap the blue and green Mode and Range selector on the lower right of the screen to change your instrument settings and how sensitive you’d like the tuner to react.
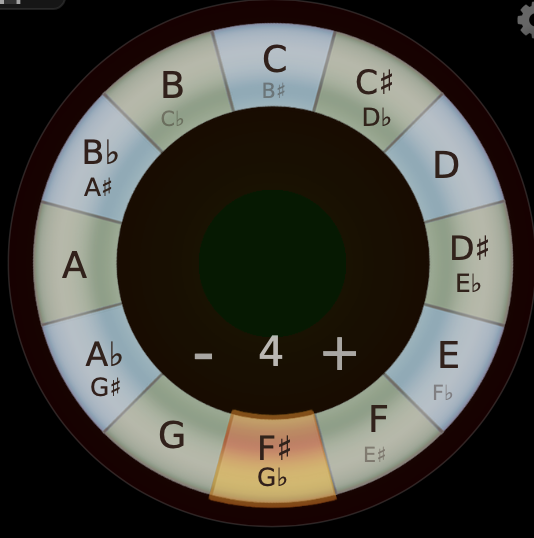
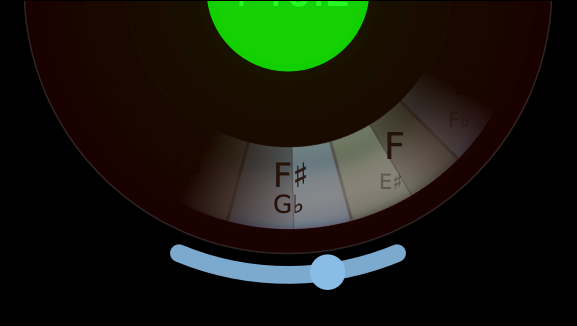
Chromatic Tuner Wheel
The Chromatic Tuner Wheel is a part of the Target Tuner, and lets you play reference notes for your practice.
You can display the Chromatic Tuner Wheel by tapping once on the Target Tuner. A round wheel appears with 12 pitches.
To produce a reference note, tap a note on the Tuner Wheel. Long pressing the note will produce a sustained reference tone. Tap again to release the note.
To change the octave of your reference notes, tap the plus or minus signs in the middle of the Target Display.
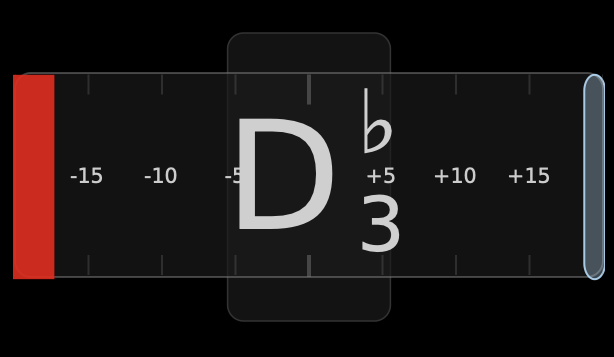
Bar Tuner
The horizontal Bar Tuner is a simpler alternative to the Target Tuner. To switch on this option, Set the Tuner Style via the Target Options settings cog wheel.
- If your note is in-tune, the center indicator lights up in green.
- If the note moves away from the target pitch, the colored indicator will move left for flat notes and right for sharp notes.
- The note playing is displayed in the center of the Bar Display.
Cent Display
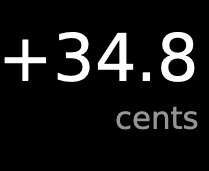 A cent is defined as 1/100 of a semitone/chromatic half step. For instance, the space between C and C# contains 100 parts, each of these being equal to one cent.
TonalEnergy Tuner goes one step further by dividing each cent into 10 parts. If the screen reads -1.1, the negative sign indicates the pitch is flat.
The whole number 1 indicates the note is one cent off. The 0.1 demonstrates the pitch is an additional one-tenth flat.
So the pitch is one and one-tenth cents flat. The Cent Display is always found in the center of the Target Tuner and either the side or bottom of the screen depending on screen orientation.
A cent is defined as 1/100 of a semitone/chromatic half step. For instance, the space between C and C# contains 100 parts, each of these being equal to one cent.
TonalEnergy Tuner goes one step further by dividing each cent into 10 parts. If the screen reads -1.1, the negative sign indicates the pitch is flat.
The whole number 1 indicates the note is one cent off. The 0.1 demonstrates the pitch is an additional one-tenth flat.
So the pitch is one and one-tenth cents flat. The Cent Display is always found in the center of the Target Tuner and either the side or bottom of the screen depending on screen orientation.
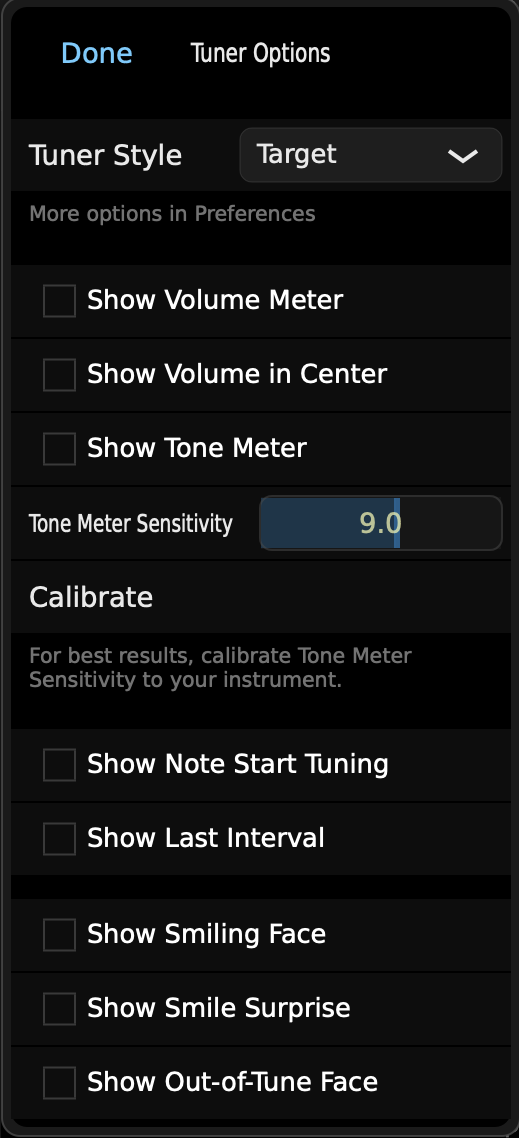
Target Options
 Several of the Target Tuner's features can be turned on and off through the Target options pop-up. To open the pop-up, tap the small gear on the upper right of the Target Tuner.
- Tuner Style - tap for three choices:
- None
- Target
- Bar
- Show Volume Meter: On/Off
- Show Volume in Center: On/Off
- Show Tone Meter: On/Off
- Tone Meter Sensitivity - provides a way to optimize the tone meter’s range for your chosen instrument.
- Calibrate
- Tap Calibrate button.
- Perform your lowest note LOUDLY.
- Alternatively, use the slider to adjust calibration manually.
- Calibrate
- Show Note Start Tuning: On/Off
- Show Last Interval: On/Off
- Show Smiling Face: On/Off
- Show Smile Surprise: On/Off
- Show Out-of-Tune Face: On/Off
- Tapping DONE, or anywhere else on the screen, closes the Target Options Pop-up.
Volume Meter
Changes in volume can be seen as blue brackets on either side of the Target Tuner.
These brackets grow or shrink with your volume level.
This option is OFF by default, so click on Target Options to enable it.
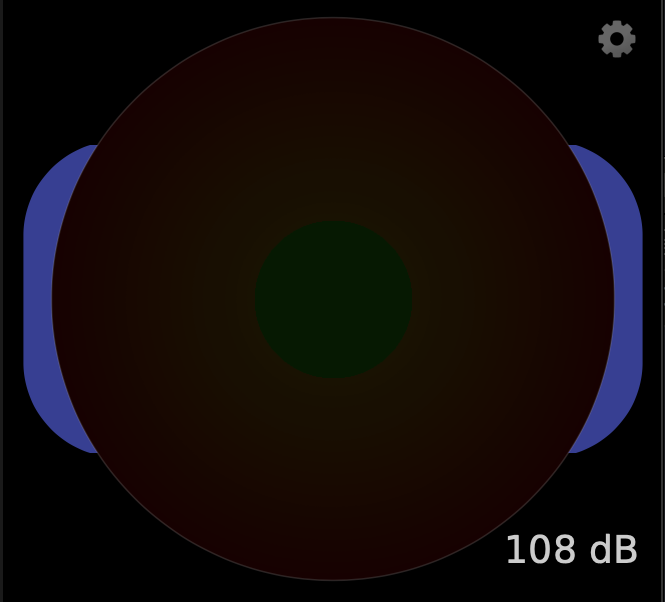
Tone Meter
The Tone Meter is shown as a colored arc with a moving dot, just below the Target Tuner. When more fundamental overtones (partials 1–6) are present in the sound, the dot moves to the left side of the arc and grows darker in color. When more higher overtones are present above the fundamental partials, the dot moves to the right side of the arc and the arc’s color lightens. In addition, the longer the quality of sound remains the same, a smaller reddish arc will appear and grow within the original arc.
If the Volume Meter is on as well, the color of the volume brackets will also reflect changes in the quality of sound.
Generally speaking, more partials are present in low register pitches than in high register pitches.
This option is OFF by default, so click on Target Options to enable it.
Pitch Display
As you play, the name of the note you’re playing will appear with a number indicating which octave you are playing.
For example, C4 is middle C on the piano.
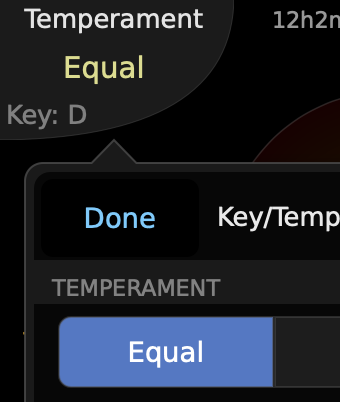
Temperament
Always be aware of what temperament you are using, as it will greatly affect the Target Tuner screens.
The Temperament button is located in the upper left corner of the screen. Tap to bring up the Temperament menu.
Select equal or a custom temperament (defaults to Just/Pure). The Key Center (just temperament tonality) is dependent upon the pitch that you’ve selected.
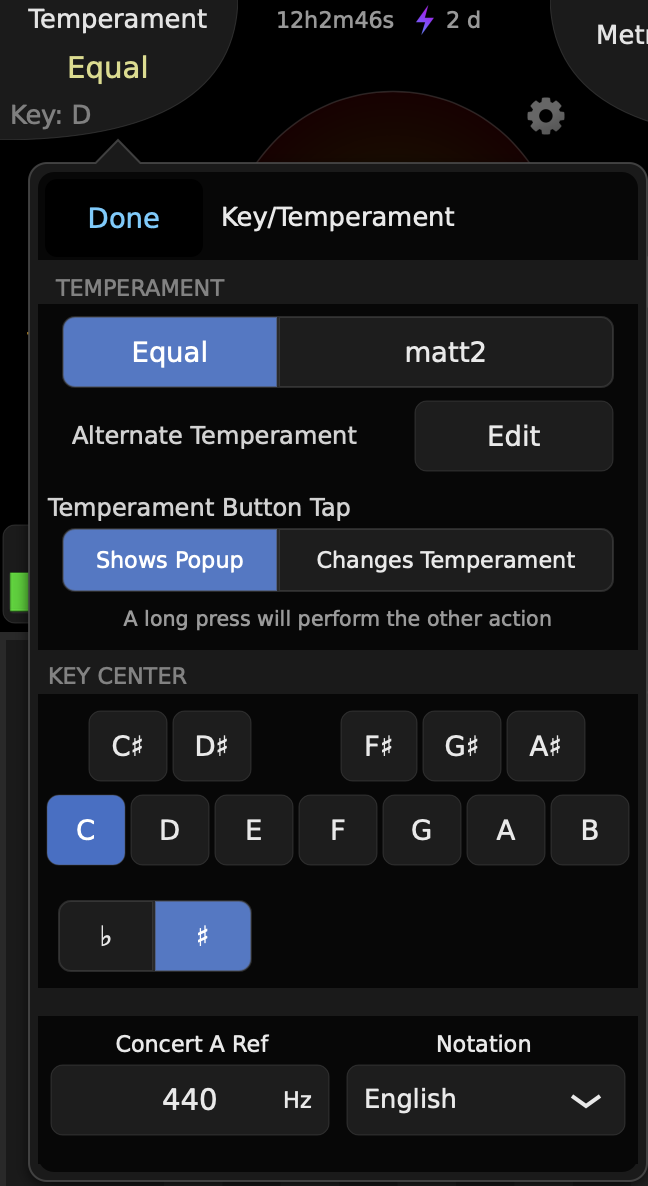
In the Temperament menu, you can configure how the Temperament button responds to a tap:
- Shows Popup - single tap to bring up the Temperament popup menu.
- Changes Temperament - single tap to immediately switch between Equal and the Alternate Temperament.
If “Changes Temperament” is chosen, long press will bring up the popup Key/Temperament. If “Shows Popup”, long press will change between Equal or Alternate temperament.
The custom temperament controller can be accessed two different ways: long press or tap the temperament button in the top left hand corner of the screen, or from the Preferences page.
To create a custom temperament:
- Tap Alternate Temperament from the Key/Temperament Popup or in Preferences.
- Tap Edit in the top right corner.
- Tap (+)
- Create a name and abbreviation for the custom temperament.
- Insert, by using the keyboard, a plus or minus cents offset from equal temperament in each interval box.
Pressing the Compose icon located on the top right corner will duplicate an existing temperament (including a factory one) to start editing a new temperament based off of a previous one.
Swipe left from the Custom Temperament list to delete a single user temperament. Alternatively, tap the “Select” button to delete multiple user temperaments. There is also a function to export / share your user temperaments.
In the Key/Temperament popup, choices can also be made regarding assigning a key center. The key can also always be changed by double-tapping a pitch on the Chromatic Wheel, Keyboard or Pitch Grid on all areas where they can be accessed. Also, adjusting the notation to address key centers and to choose a specific type of scale so the names of notes conform to a specific key and scale type are other items that can be addressed.
For convenience, Concert A Reference and Notation choices may be changed in the Key/Temperament popup as well. All of these choices can also be found in Preferences.
Temperament Theory
Equal temperament means that each chromatic pitch is 100 cents from the adjacent notes. All chromatic, half step/minor 2nd, intervals are equal distance from each other.
Just temperament is used for tuning notes in the same overtone/harmonic series. This is most commonly used when tuning major and minor chords. To change the root key of the temperament, double-tap a note on the pitch wheel (on the tuner page or Sound page), or on the keyboard of the Sound page.
Most often used for tuning major and minor chords, Just temperament is used for tuning notes in the same overtone/harmonic series. For a major chord to be in tune with just temperament, the perfect 5th (3.5 whole steps) should be raised by 2 cents and the major 3rd (2 whole steps) should be lowered by 14 cents (raised and lowered from the equal temperament scale). Minor chords require the minor third (1.5 steps) to be approximately 16 cents sharp. Tuning using just major and minor temperament will eliminate any sound waves you hear between the root (pitch the chord is built on), the third, and the fifth, resulting in a more pleasant sound. TonalEnergy will auto-detect in root, first or second inversion any just major or minor chord. The feature works when using the Chromatic Wheel or a midi-keyboard. While sustaining a major or minor chord, you can double tap any pitch on the Chromatic wheel for the tonal center (key signature) to change.
Transposition, Concert A Reference (Hertz) and Notation
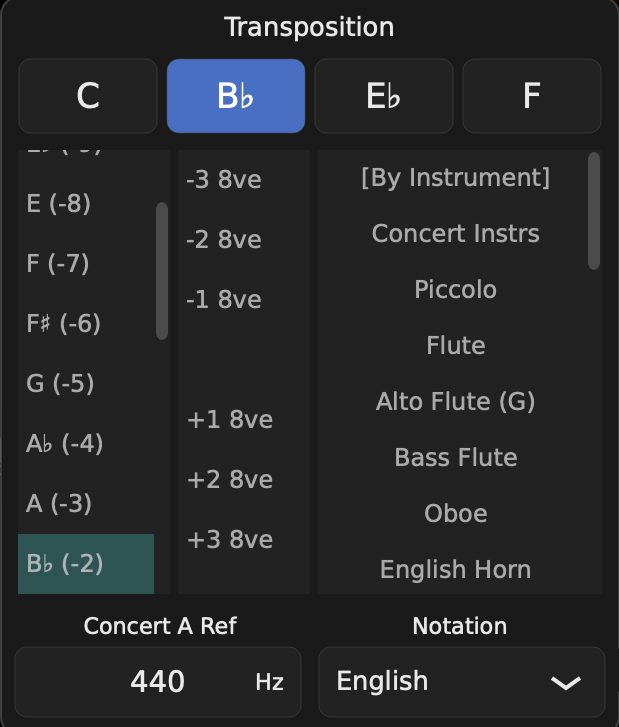
The TRANSPOSITION pop-up is on the Main Target Tuner screen, the Chromatic Pitch Wheel, the Keyboard and the Analysis pages. This feature allows you to select the desired transposition.
- TRANSPOSITION: An indicator of the transposition for which the tuner is set. To change, tap Transpose in the lower right hand corner and a pop-up will appear. To select the correct transposition and octave, scroll to choose the key of transposition, or the instrument.
- To select your instrument, tap the instrument selection bar. This allows you to scroll to the desired instrument. Once the instrument is selected, the transposition is automatically selected. For example, the alto saxophone is an Eb transposing instrument. When you select alto saxophone, the transposition will automatically move to Eb. The tuners, chromatic wheel and keyboard will also adjust so that the alto saxophone C natural will be recognized as a concert Eb. The TonalEnergy Tuner also gives you the choice to not use concert pitch as the default. Once engaged this function allows the TonalEnergy Tuner to transpose to the instrument key automatically for commonly used wind instruments. You may manually change the transposition for less common instruments to better suit your needs (a C, D, or Eb trumpet, or Bb French Horn). The most commonly used instruments are listed in music conductor’s score order. They are grouped in instrument families and from high woodwinds to low brass.
The term “concert pitch” is used to indicate the difference between your “written/notated” pitch for your instrument in your music and the “sounding” pitches in music scores.
When one of the Indian Notations is selected in the preferences, the transposition is labeled as the Shruti number.
- CONCERT A REFERENCE: You can change the Concert A Reference from A4, 440 Hz to the reference frequency number you prefer. In order to change the number, tap the number. A keyboard will appear. Type in the new reference frequency number and touch return. Tap done. This calibration number will remain unless you change it again. There is no default.
- NOTATION: The desired notation of the displayed note names can be selected from the Notation scroll bar. Several variants of English notation, Solfège, Northern European, and Indian options are available.
More information can be found in the TE Preferences section.

Pitch Tracker
The Pitch Tracker is a red, yellow and green bar showing the percentage of pitch in-tune for the session or timed event. It is found on the Target, String Tuner, Sound, and Analysis pages (usually at the top middle). The colors and percentage are determined by the amount of time the notes were performed within the tuning parameters set in the Mode and Range pop-up.
Tapping the Pitch Tracker bar brings up a menu with several options:
- Start New Timed Event
- Practice Timer
- View Last Timed Event
- Show Current Session
- Show All Activity
Start New Timed Event
A timed event is a single performance showing tuner analysis data and overall time for the performance.
- Tap on “Start New Timed Event”, do the performance, then tap the Pitch Tracker Bar again.
- Choose from:
- Finish Timed Event.
- Finish and View Timed Event.
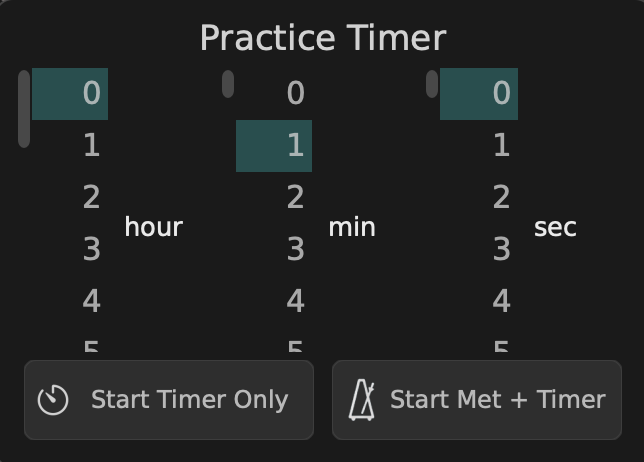
Practice Timer
Replaces the session time display (usually located at the top middle of the screen) with a stopwatch timer for your practice. Choose to run the time with or without metronome. When the timer stops, the metronome will also stop playing.
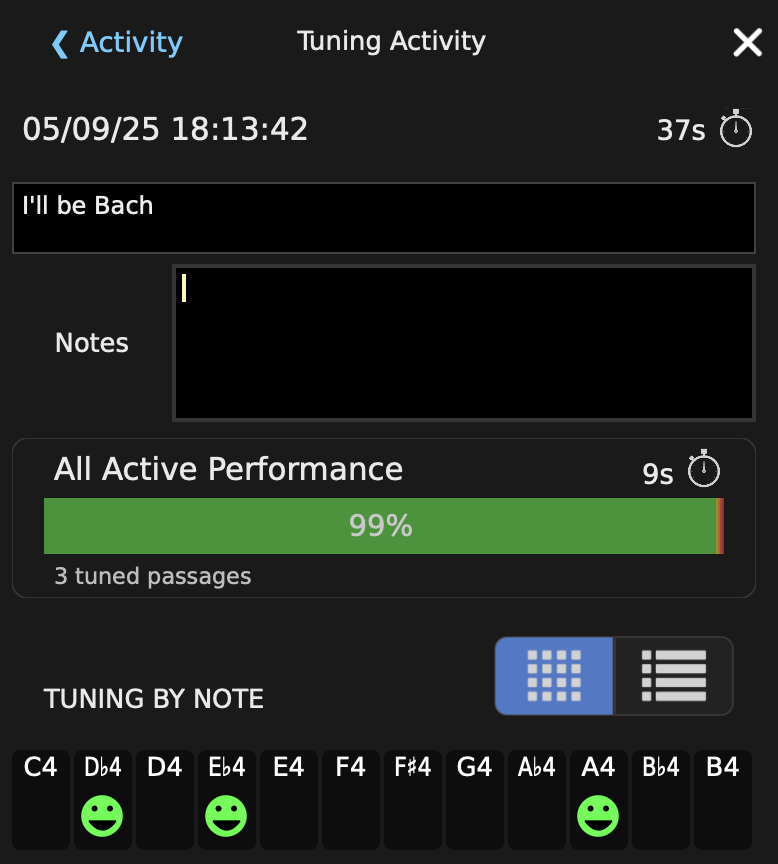
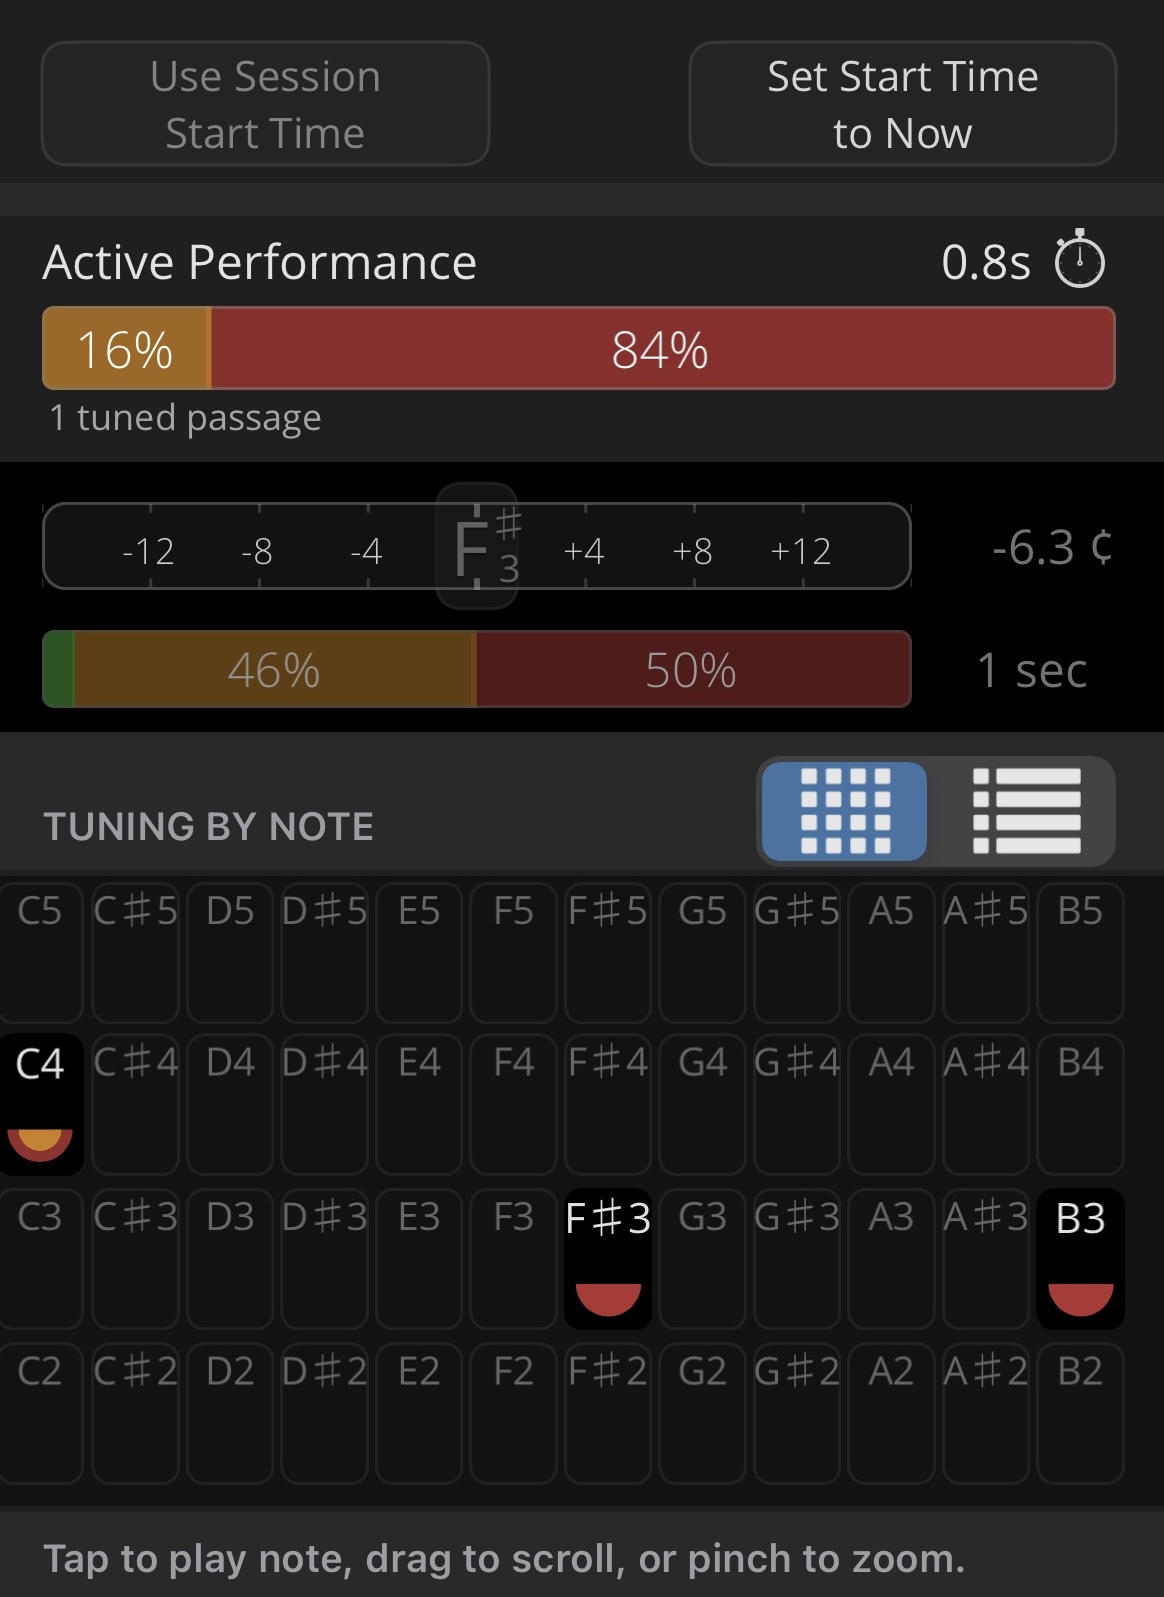
Show Current Session
Tap this button to view data from current session on the Tuning Activity page.
User Session Start Time: reports all data from current session.
Set Start Time to Now: reports data from now. The full session data continues to record as well.
TUNING BY NOTE: Displays a grid or list of Tuning Statistic Icons:
Tuning Statistic Icon: The relative sizes of each colored part (green, orange, red) are proportional to how much of the time the note is in-tune or out-of-tune. The orange/red rings are split, independently showing the proportion of how flat or sharp each note is. A green dot appears if the note was in tune more than 50% of the time. A green line smiley face appears if the note was in tune 50–79% of the time it was played. A green thick smiley face appears if the note was in tune 80–100% of the time.
Two view options are available:
Chromatic Tile Grid: a NON-sortable tuning chart. Tap to view.
Vertical Pitch List: a sortable tuning list, which can be sorted by 3 options:
Note: tap to select one of three note sort choices:
- Low to High
- High to Low
- Group by Octaves
Tuning
- A graphic representing the intonation of every pitch performed during the session.
- Tap to sort either most in tune notes or out of tune notes.
Performance Time - tap for three choices:
- Sort Short to Long
- Sort Long to Short
- Hide Very Short Notes
In both orientations, Chromatic Pitch Grid and Vertical Pitch List, touching the note name plays your chosen pitch. Long press to sustain the note.
In the Tuning or Performance columns, single tap and/or drag multiple note names to select a range. Pinch to zoom in or out for easier viewing. Double tap with two fingers or tap the delete icon (X) on the TUNING BY NOTE line to clear the range.
After two or more seconds of silence, this feature automatically resets.
Activity Page
The purpose of this page is to provide the means to review a wide variety of user data in TET stored on your device.
To access all data, select one of two choices: “Show Current Session” (See Pitch Tracker) or “Show All Activity.”
Calendar Views
- To view weekly practice history, swipe left or right.
- To view monthly practice history, swipe down to see the entire month. Then swipe left or right to view different months.
- To select a date range, tap the calendar button in the top left corner.
- Tap Select Range.
- Tap two dates, a start and end date.
- All activity data for date range will appear.
- Tap Done to exit.
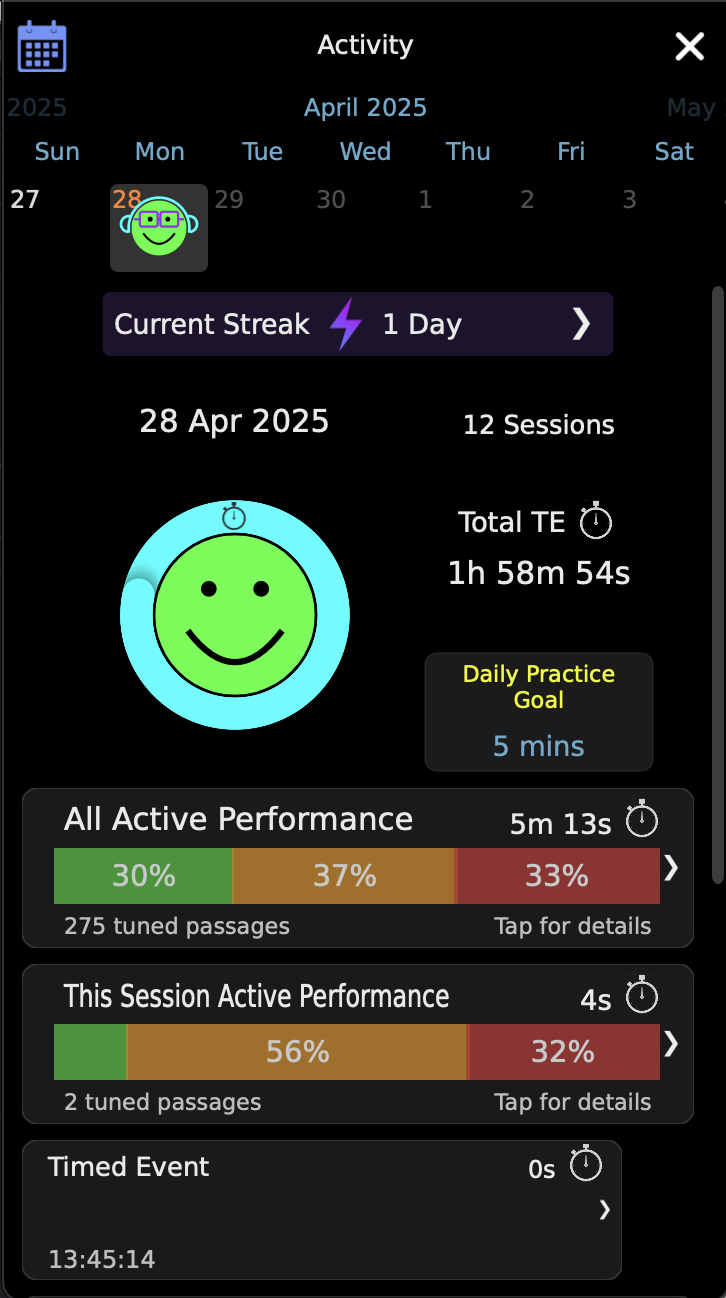
Tap the right arrow next to Current Streak to open the PRACTICE STREAKS page.
Number of Sessions records how many times you opened TET that day.
Total TE Time reflects how long TET has been opened that day.
Daily Goals
Daily goals can be set for a variety of categories:
- Practice Time
- Metronome
- Sound
- Recording
- Analysis
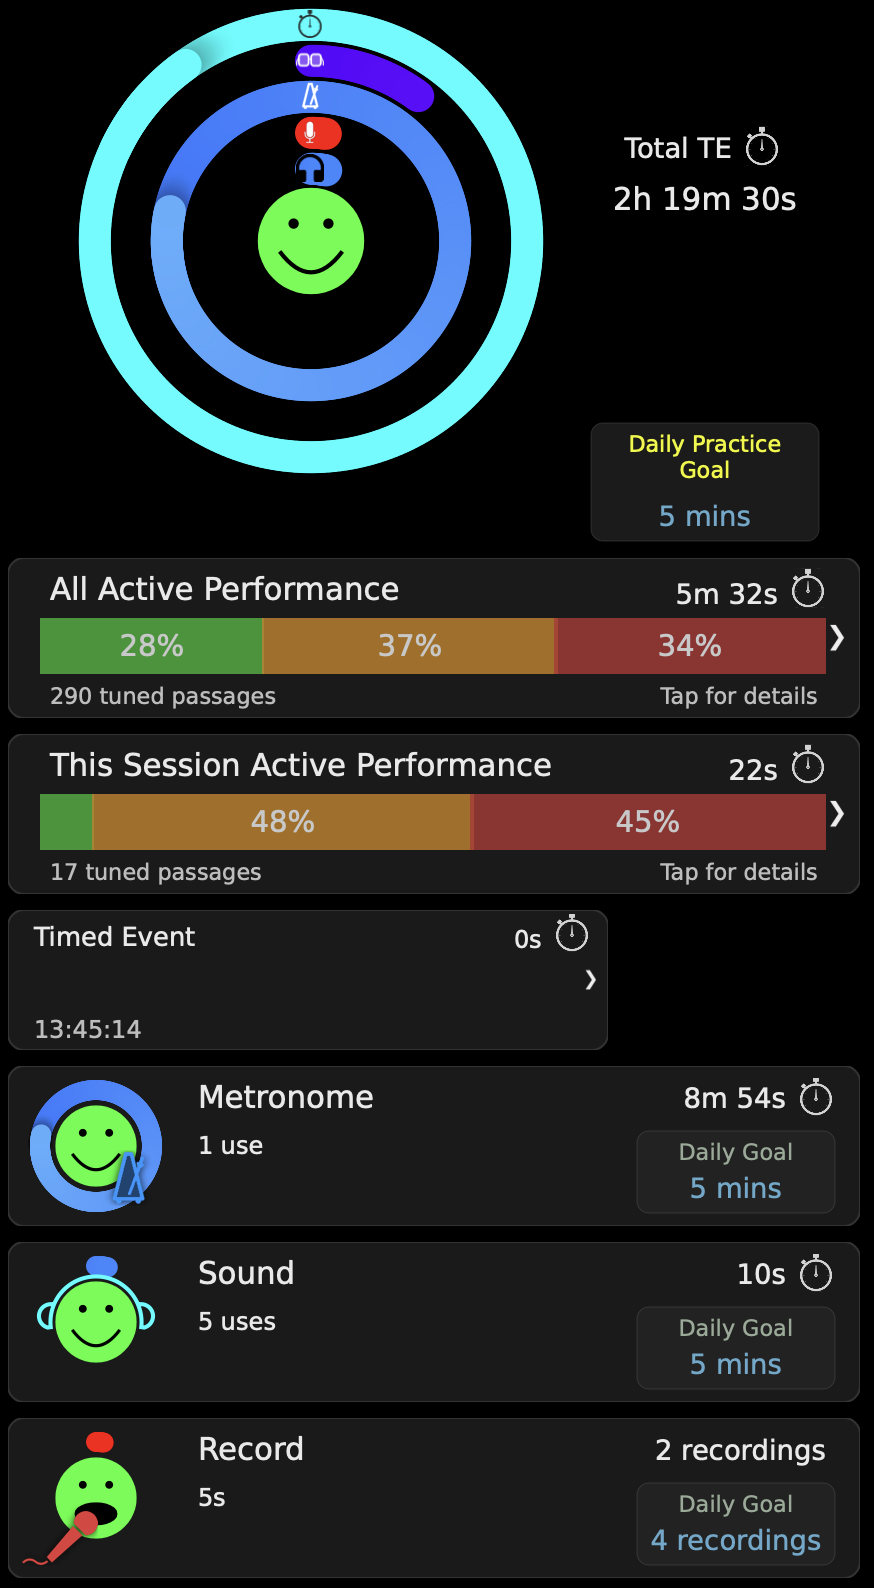
These goals are then displayed as colored Daily Goal Achievement Rings around the smiley face.
- Yellow: time toward daily goal.
- Blue: time with metronome on.
- Red: number of times the recorder was used during practice time.
- Purple: time spent on analysis page.
- Light blue: amount of time TonalEnergy sounds were used.
Setting of Daily Practice Goals:
- The Daily Practice Goal selector can be found to the right of the smiley face / achievement rings.
- Scroll down the page to reveal The Daily Goals for the remaining categories.
- In all cases, click on the Daily Goal box to choose your goal.
Daily Practice Goal, Metronome, Sound and Analysis are measured in minutes. Recording is measured by the number of recordings.
Data Bars
- All Active Performance is a tuning analysis of individual notes played during that calendar day.
- This Session Active Performance only appears when two or more sessions occurred during the same day and reflects the information for the current session.
- Timed Event allows you to choose a specific start and end time.
If there is more than 1.5 seconds of silence, a new passage is created.
When you tap on either All Active Performance, Session Active Performance, or Timed Event bar(s), you will be moved to the appropriate Tuning Activity Page.
Achievement Icons and Goal Setting - how to interpret icons:
- Icons are in the color related to the rings…eg. Blue for Metronome.
- Key for icon symbols
- Metronome: traditional blue metronome
- Sound: light blue headphones
- Recording: red microphone
- Analysis: purple eyeglasses
- Smile interpretation
- A line smile indicates TET was opened.
- An open big smile indicates the daily goal was met.
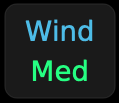
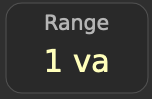
Mode and Range
The MODE/RANGE icon features a MODE name in blue text and a RANGE setting in green text. By default it is set to WIND / MED. It is located at the lower right hand corner below the target or bar tuner.
MODE refers to the family of instruments you’re using, and RANGE refers to the width of tuning considered to be in-tune.
Tap on the MODE/RANGE icon to adjust your settings.
MODE: options are wind, strings or voice.
RANGE: options are wide, medium, fine and ultra-fine.
Each mode-range combination has unique tuning parameters. There is a note about these parameters below the selector. The finer the range, the more exact the pitch must be to be rewarded with the smiley face. The exact cent display is always visible for you to reference.DAMPING: Slow, normal, and fast refer to the length of time the sound sample is measured. Slow would be the longest time during which the pitch would be averaged. Each damping setting is specific to the selected mode.

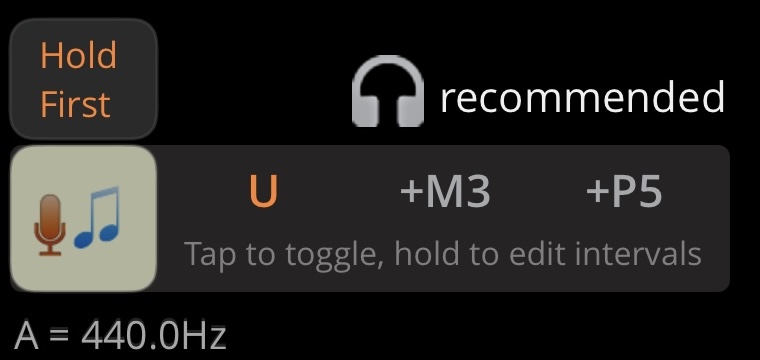
Auto Reference Notes
The microphone and notes icon in the lower left corner engages the Auto Reference Notes feature.
With Auto Reference Notes enabled, the tone generator follows your notes as you play them.
Tap the interval icons to activate up to three intervals for the Auto Reference Notes to play. Interval icons turn orange when activated. Long tap (or hold) to set the interval for that voice to play.
The Auto-Reference notes will ONLY match the range of the Tone Generator sound you have selected. If you attempt a note out of the range, it will not work.
Depending on your purpose, there are multiple suggested setups to get the best function out of this system:
Use your device’s built in microphone and a set of headphones or earbuds. This setup enables you to hear the reference note while still allowing the tuner to evaluate your intonation.
You may want to experiment with using only one earbud in order to discover the best environment for hearing yourself play.
Use the device’s built in microphone and an external speaker connected in the headphone jack. For this setup the device needs to be within close proximity (within 24 inches) of the player.
Use an external microphone connected in the headphone jack and an external speaker compatible. An iRig microphone (built in gain control) or a standard microphone plugged into a mixer. This also enables the player to hear the reference tone through speakers.
Using an external speaker (#2 and #3) will cause the auto reference notes feature and the tuner to be less effective because the tone playing on the speaker becomes an additional ambient sound.
On the Chromatic Pitch Wheel and Keyboard pages, the microphone and sustained button will not work at the same time. If the microphone button is on, the sustain button does not work.
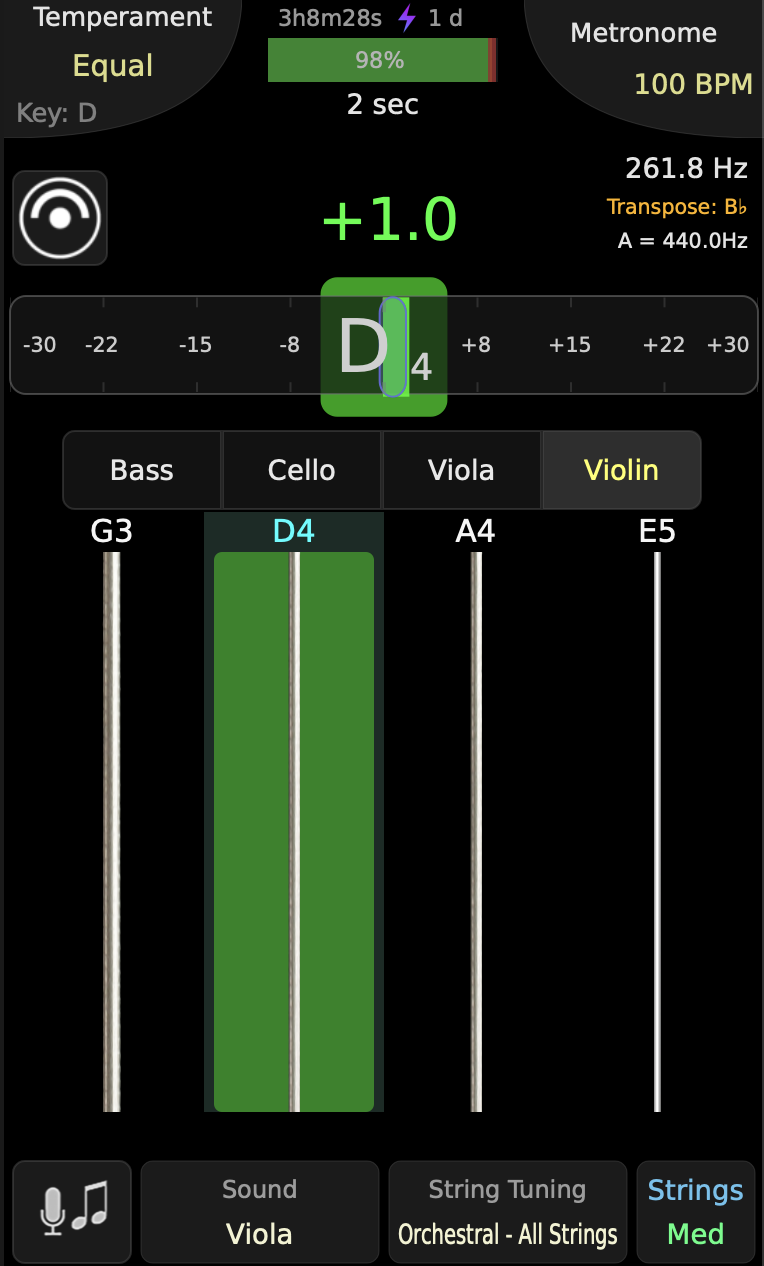
TE String Tuner

The TE String Tuner is an interactive view showing the strings of a wide variety of string instruments. You can play your chosen instrument by tapping or sliding onto a string. Likewise, any notes played through the microphone will be shown by the tuner on their corresponding string.
There are two ways to activate the TE String Tuner screen:
On the Target Tuner screen, tap the string headstock icon in the upper left corner just under the Temperament button.

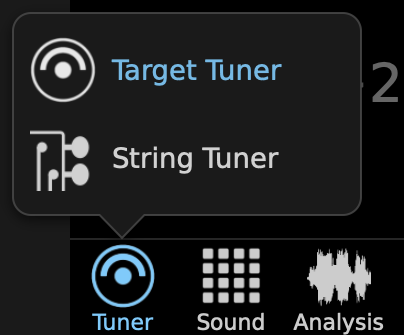
Tap the Tuner tab button in the lower left corner. Choose String Tuner from the pop-up menu.
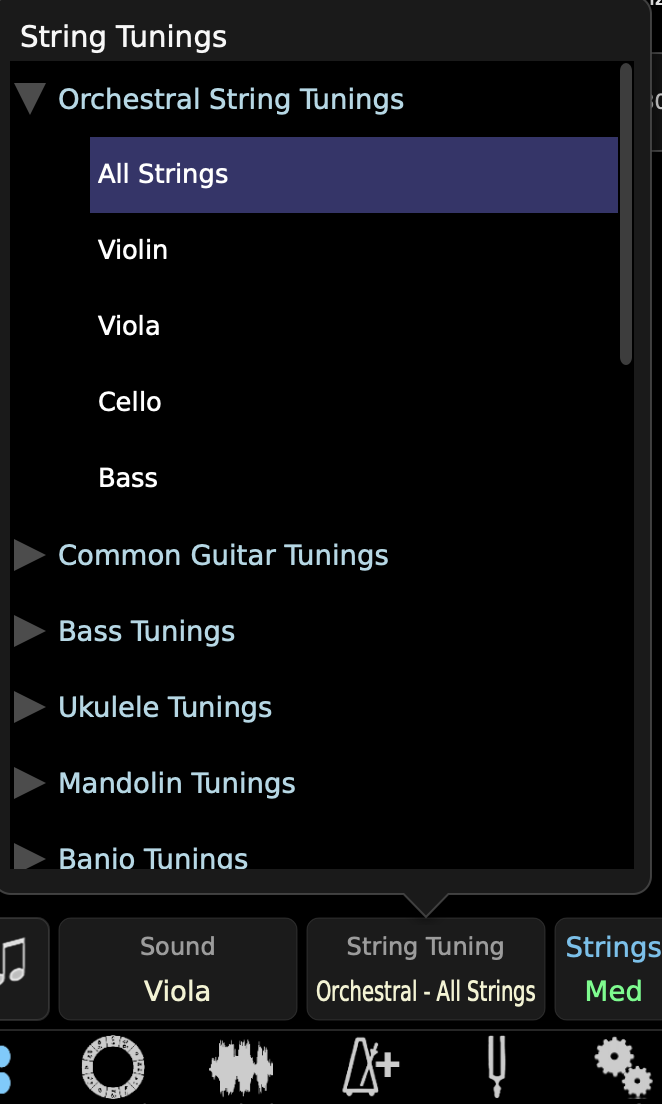
There are multiple tunings for each string instrument. The most commonly used tuning is always the first one displayed. Equal temperament is the default for the fretted string tunings. The Orchestral String Family custom temperament will be notated as Orchestral All Strings and you can also toggle to Equal Temperament.
Orchestral All Strings: The TonalEnergy Tuner temperament default is set to tune the Orchestral Strings using a “special” Just intonation feature called Perfect 5ths. The player starts tuning their instrument beginning on the instrument’s open “A” string to create all perfect fifths to the adjacent string. All pitches that are not an open string on the four orchestral string instruments are equal temperament on the Target Tuner.
When the String screen is activated, the default sound will be the Plucked String. Other instruments may be chosen to tune the string instruments, as long as the instrument range allows for the correct octave to be played.
The Plucked String, Orchestral String Sounds, Saw Wave, Square Wave and Organ are the most commonly used tones for tuning string instruments.
When tuning the open strings, once a note is played, the area around a string will light up. If the color is green, the pitch of the open string is in tune. If the colored dome is either orange or red, the pitch is either sharp or flat. The domes appearing at the top or bottom of the string indicates you are either playing a note that is not an open string or is still slightly out of tune. Like the Target tuner, orange indicates the tone is closer to the desired pitch than does red.
To hear open string sounds, touch one or more strings.
Long press a string or strings to continue to play the tones indefinitely. The Plucked String instrument will re-trigger after decaying to silence once you have long pressed the tone. To turn off a pitch, touch the string while the tone is sustaining. All tones will stop.
When turned on, the microphone button to the left of the pitch boxes will reference the pitch you’re playing. Refer to the Auto Reference Notes section under the Target Tuner for more information.
The Mode and Range button in the lower right corner allows you to adjust length of time the sound sample is measured with the choices being Slow, Medium and Long. Slow would be the longest sample time during which the pitch would be averaged.
Consult the Mode and Range pop-up box to determine which damping setting will be best.
For instant pitch reference, tap the tuning bar at the top of the String Tuning page. To sustain the pitch reference note, long press. To release, tap anywhere on the tuning bar.
TE Metronome
The TE Metronome can be used in Simple mode for basic metronome duties such as clicks and count-ins, or Advanced mode for a wide variety of further functions.
In this user guide, Advanced mode functions are followed by: (++).
Tap on the metronome icon to change between modes.

Using and accessing the Metronome from other pages
There is a Metronome Button in the upper right corner of other screens.
To start or stop the metronome on other pages just tap the Metronome Button.
To access the pull-down metronome control panel from other pages, swipe down from the Metronome Button.
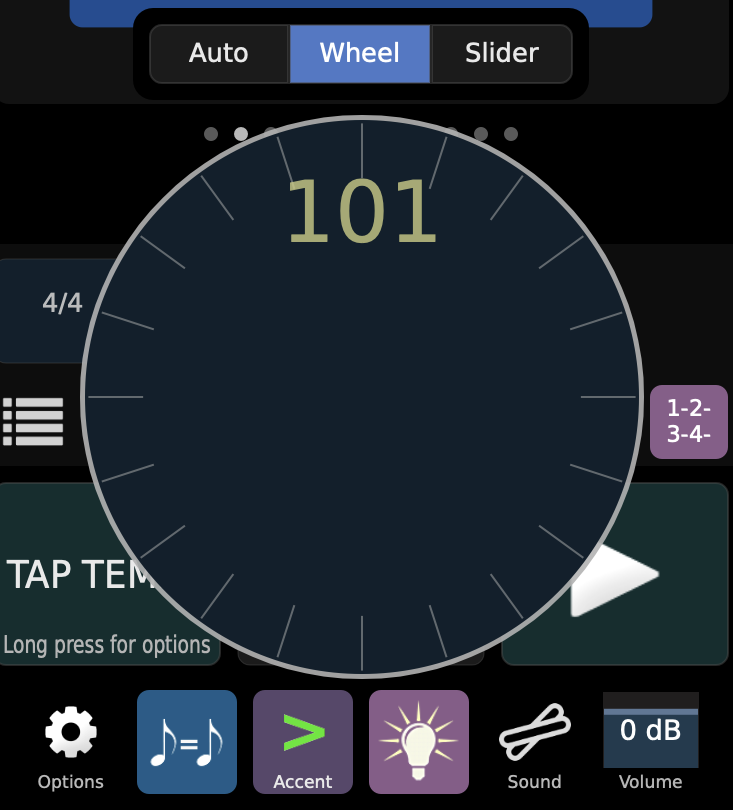
Setting Tempo
To establish the tempo in beats per minutes (bpm), you have three options:
- Repeatedly tap the Tap Tempo button at the bpm until you reach your desired tempo.
- Use the + and/or — signs to raise or lower the bpm shown the display. Press and hold one of the +/- buttons to bring up a slider or wheel (chosen in metronome options) to move faster through the range.
- Tap on the tempo number and type in the desired bpm with the numeric keypad.
Beat Chooser (++)
The first option at the top of the Advanced Metronome is the Beat Chooser. By default, this is set to a quarter note, but can be changed to eighth, quarters, halves or dotted halves if required. Click the note icon to change it.
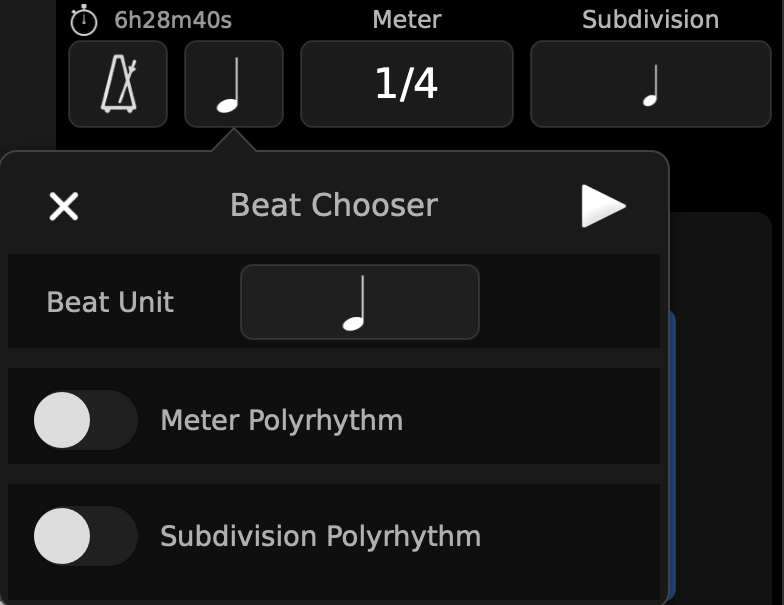
Polyrhythms (++)
Meter (++)
To change the meter, tap the meter toggle button. A scroll screen will appear. Select the meter. The item at the bottom of the popup allows you to enable/disable auto-hiding of the menu after a selection.
Subdivision
To change the subdivision, tap the subdivision toggle button. A scroll screen will appear. Select your subdivision. To dismiss the scroll bar, tap anywhere on the screen. The item at the bottom of the popup allows you to enable/disable auto-hiding of the menu after a selection.
Tempo Options
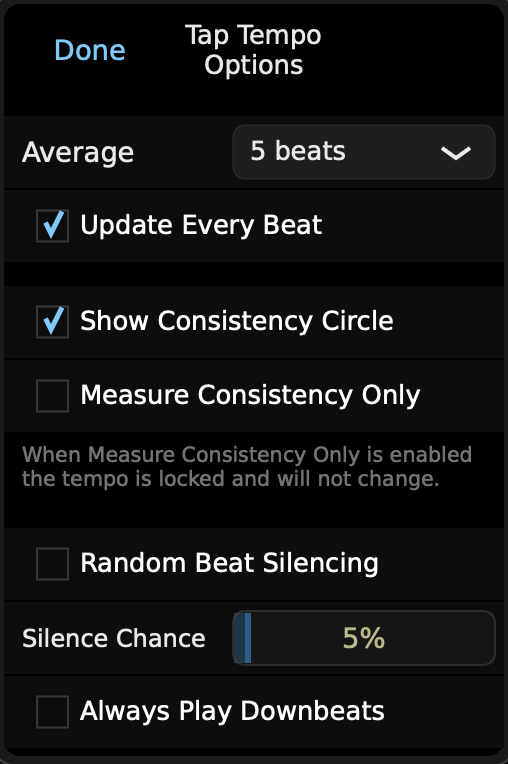
Several Tempo options are available via a long press on the Tap Tempo button:
- Average: The number of tapped beats required for the tap tempo to take an average. Higher values should give more accurate results, while lower values will give faster results.
- Update Every Beat: Whether the tempo should be updated on every beat, or on each full number of average beats.
- Show consistency circle: This enables a circle and smiley face graphic to appear on the tempo play button to show how consistent your taps are.
- Measure Consistency Only: If this is enabled, the tempo will not change when the tap tempo button is tapped. This lets you see how consistent your taps are, without altering the tempo.
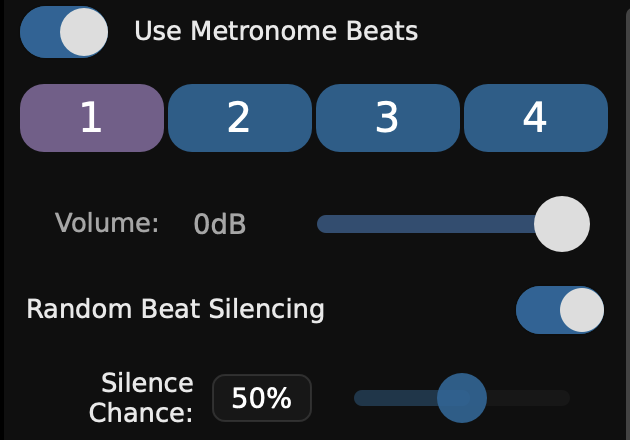
- Random Beat Silencing: If this is enabled, the metronome will randomly silence beats. Use the slider to choose how often beats should be silenced.
- Always enable downbeats: If beat silencing is enabled, this will always play the downbeat on each bar.
Volume
To increase or decrease volume, hold down the volume button and slide your finger up or down until you reach the desired volume. Values greater than 0 dB might lead to distortion but can still be useful in extreme situations.

Visual Flash (++)

Visual Flash enables a flashing beat indicator in the metronome control area. Tap the lightbulb icon to bring up the visual flash menu.
There are 3 choices for visual flash:
- Off
- Beats
- Bars
“Show Current Beat” affects the block display in the Metronome Animated Display.
If you want a silent visual metronome, simply reduce the metronome’s volume all the way using the control in the metronome panels.
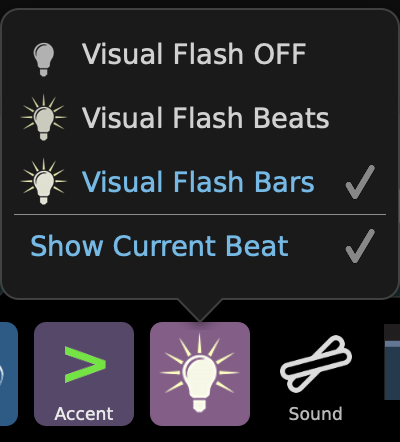
Accent

The Metronome Accent (> ) button toggles the use of an accented sound on the first beat of each measure. When the Visual Metronome is engaged and the accent toggle is turned on, the first beat of each measure will flash purple.
Sound

Brings up the current metronome sound selector quickly.
Preserve 8th Note Durations (++)
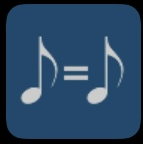
This button toggles a feature that will automatically adjust the tempo when you switch back and forth between a X/4 or X/2 meter and an X/8 meter in order to keep the duration of an 8th note identical. Note that in order for this feature to work in Preset Sequence mode, the presets to be switched need to have Use Tempo disabled so that the tempo can be automatically adjusted depending on what came before.
List Button (++)

The list button in the lower left corner allows you to build Groups (See Metronome Preset Groups).
Preset Sequence (++)
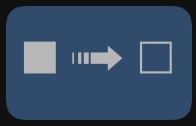
The Preset Sequence (◼︎➟◻) button is in the lower left corner and allows you to advance or sequence through two or more presets.
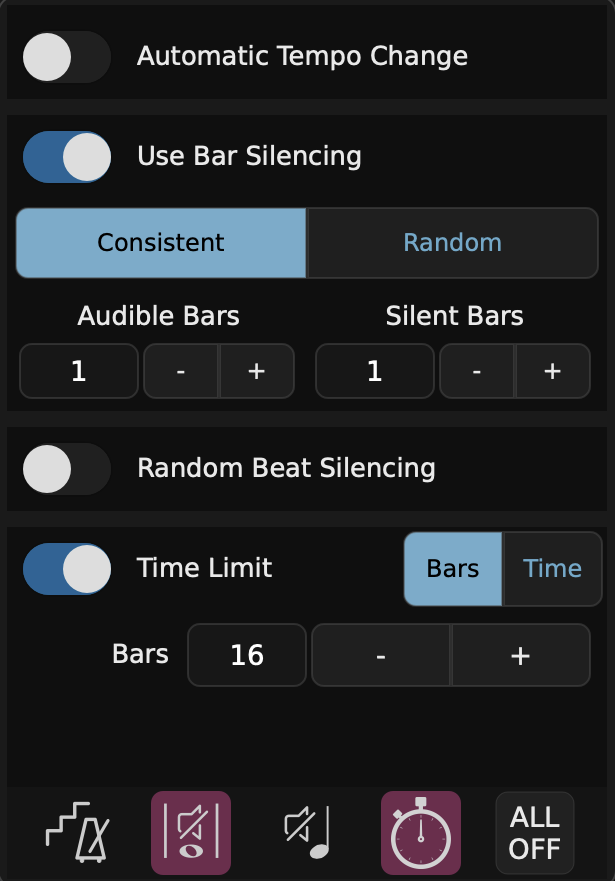
Metronome Assistant

Tap on the Metronome Assistant Robot to bring up a menu with a variety of options to how your tempo will be played.
- Automatic Tempo Change
- Change Every: allows you to decide how much you want to increase or decrease the BPM over # of bars or over time.
Use the +/- or number keyboard to adjust your parameters - Tempo Range:
- You must set a start and end tempo by using the min and max tempo buttons.
- Stop When Limit is Reached — toggle switch on if you want the assistant to stop when Max Tempo is reached.
- Change Every: allows you to decide how much you want to increase or decrease the BPM over # of bars or over time.
- Use Bar Silencing: toggle to turn this feature on/off
- Consistent: you may choose to create a consistent metronome pattern of Audible and Silent bars by using the +/-.
- Random: you have the choice to create min/max bars and min/max silent bars by using the +/-.
- Random Beat Silencing: toggle on and off
- A slider appears with the range from 5%-95% for beat silencing.
- Time Limit: You select either Bars OR Time for the exercise created
- Bars: Use +/- to select the number of Bars.
- Time: Scroll in the pop-up at the bottom of the page to select the number of minutes and seconds.
To quickly turn on or off any of the Metronome Assistant Features, you can tap the icons at the bottom of the page.
To quickly turn off ALL Metronome Assistant features, tap “ALL OFF” at the bottom on the right.
Count-In

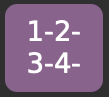
A voice count-in for the metronome is available, which can be enabled by pressing the “1–2–3–4” button in the top panel of the simple metronome, or just above the metronome start button in the advanced metronome.
Count-In Type – Choose when the count-in should occur:
- Start – only once when the metronome is initially turned on
- Range Start – at the beginning of the currently selected preset range (useful in Sequence mode, especially when looping is enabled)
- Each Preset – the beginning of each Preset (when in Sequence mode)
- Each Bar – between each Bar of the preset.
- Count Only – only the count-in is heard when starting the metronome, then the metronome is automatically stopped
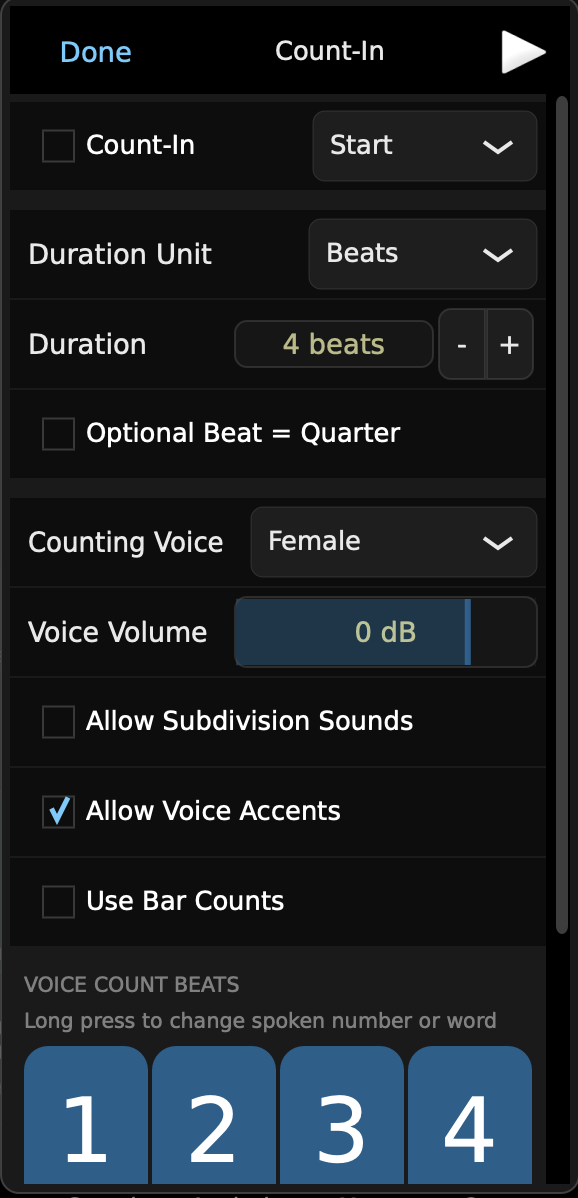
Count-In Settings
The full count-in settings can be accessed by long-pressing the Count-In button on the metronome page, or by tapping the Info button on the right side of the count-in item in the Preset Group editor, or the Metronome Options.
- Duration Unit – Choose the time unit: 1) Bars, 2) Beats or 3) 8ths.
- Duration – Once the duration unit is selected, determine the number of 1) Bars, 2) Beats or 3) 8ths.
- Counting Voice – Select between male and female.
- Allow Subdivision Sounds – Turn the switch on if you want to hear subdivision sounds.
- Allow Voice Accents – When enabled and when using bar counts is enabled, it will use an emphasized voice for the bar counts.
- Use Bar Counts – Turn switch on if you want to hear the bar number on the first beat of each measure.
- Voice Count Beats and Metronome Beats – Tap the blocks of the number of the beats you want to hear. You can use either voice or metronome or combine them as you see fit.
Metronome Options

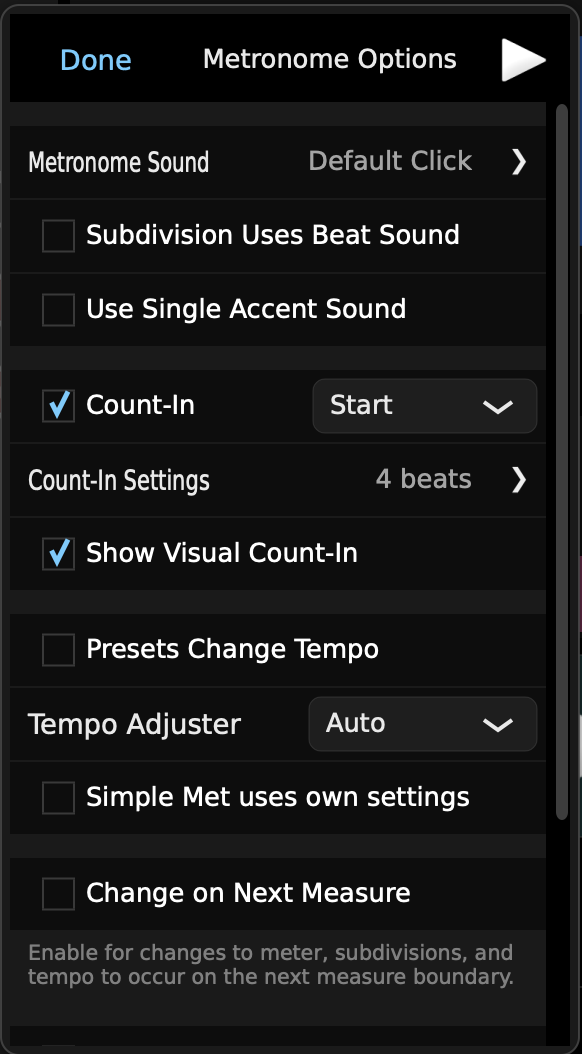
Tap the Metronome Options gear icon found on the Main Metronome page, or the quick swipe down metronome panel.
- Tap Metronome Sound, then scroll and select the sound you want.
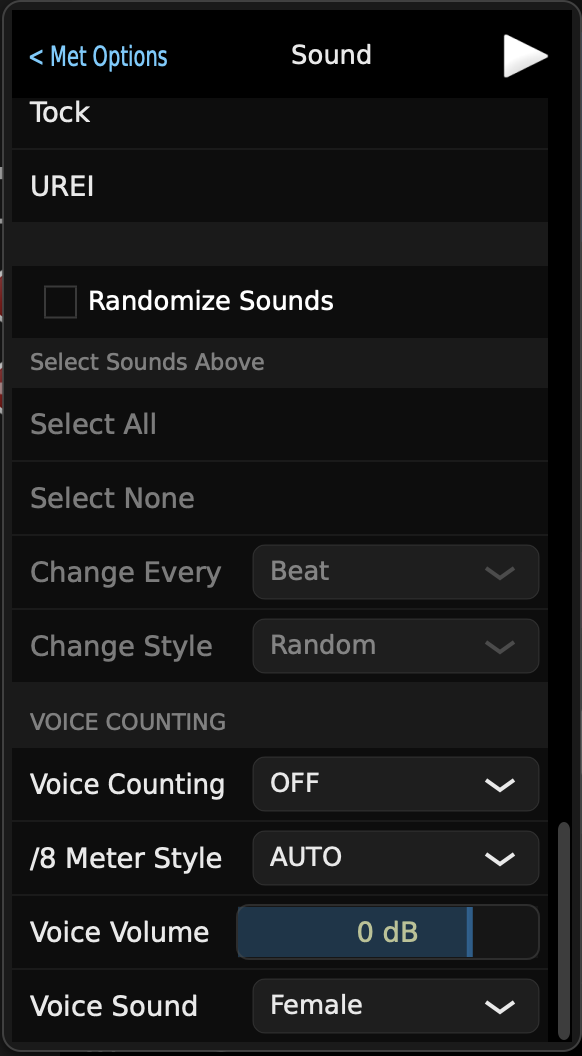
Scrolling to the bottom of the Sound menu reveals the options for “Randomize Sounds” and “Voice Counting”
When Randomize Sounds is enabled, sounds may be selected to play randomly, or in order of selection. These sounds can be chosen to change on every beat or every bar. Select all / select none buttons are provided for easy selection or clearing of selections.
Voice counting can be used in conjunction with a normal metronome sound if desired. A Male or Female voice can be chosen to play alongside or instead of the metronome sound. If an /8 meter is played, voice counting can be heard on either subdivision beats or on every 8th note. Use the /8 Meter Style selector to choose this (or select Auto to let the app choose for you).
The Subdivision Uses Beat Sound option can be used to override the default subdivision sound, and use the normal beat sound instead.
The Uses Single Accent Sound if enabled will make any secondary accents (not on the first beat) sound identical to the primary accent sound.
Count-In options can be set here, refer to Count-In for full details.
Show Visual Count-In – Turn Show Visual Count-In switch on to see the Count-In countdown box in the middle of the screen.
Presets Change Tempo – If the Presets Change Tempo switch is on, tempos for each preset will be played. If the switch is off, the first tempo setting will be played throughout the sequence.
Tempo Adjuster – choose what kind of pop-up control is used when long-pressing on the tempo +/- buttons, either a Slider or a Wheel, or Auto (which adjusts automatically by 10s while the button is pressed) .
Change on Next Measure – Turning this switch on will result in the metronome changing the meter and/or tempo once the last beat of the previous measure is complete.
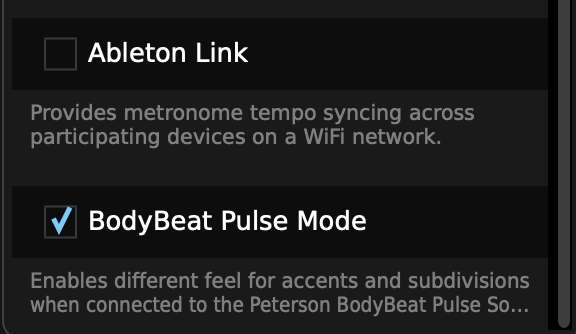
Options are also available here for Ableton Link and BodyBeat Pulse Mode
Ableton Link
Ableton Link is a technology that keeps devices in time over a local network. You will be able to access Ableton Link using the main preference button found on any page or the metronome page options button. When Ableton Link is engaged by turning on the switch, it can sync the metronome with any other device that has also engaged Ableton Link. You can choose to be notified when apps join or leave.
BodyBeat Pulse Mode
Enables different feel for accents and subdivisions when connected to the Peterson BodyBeat Pulse Solo.
Metronome Animated Display
Below the Meter and Subdivision selectors on the main metronome page is an animated display with various options for showing the metronome in a visual way. Scroll through screens with the row of dots below the display. The following options are available:
- Beats
- Smile in a Box
- Wiper
- Smile Wiper
- Smile Bouncer
- Pendulum
- Whip
- Shoe Tap
- Hand Clap
- Timer
- Bar
Tap Functions:
- Beats: Each number represents a beat in the selected meter. Once the metronome is engaged, the beat the metronome is playing will have a green background. By tapping on various blocks, you can create different combinations of clicks, accented clicks, and silence.
- Whip: Tap to change vertical / horizontal orientation.
- Shoe Tap: Tap to change left / right direction.
- Hand Clap: Tap to change left / right direction.
- Timer: Use the controls to set a timer and start / stop with or without metronome. While the time is running, a purple line line around the Animated Display will get shorter and shorter until the timer is finished.
- Bar: This is useful if you need to see tuner intonation while in the metronome page.

Metronome Presets (++)
The purpose of Metronome Presets is to save and load a variety of metronome settings when needed. For example, you could make one preset that plays 3 bars at 4/4 time, and another preset that plays 4 bars at 3/4 time. You could then manually switch between those presets, or play them in a looped sequence.
The following sections all relate to Metronome Presets and Preset Groups. On a phone, the editors for these will fill the tuner screen, whereas large format devices will have the option of two and three panel layouts.
A wide variety of metronome options are available to store in Metronome Presets, including:
- Preset Name
- Meter
- Subdivision
- Bars to play
- Tempo (Fixed, Gradual, Relative)
- Polyrhythms
- Beat and bar silencing
- Voice count
- Drones
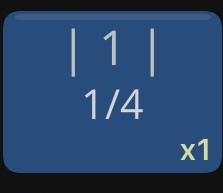
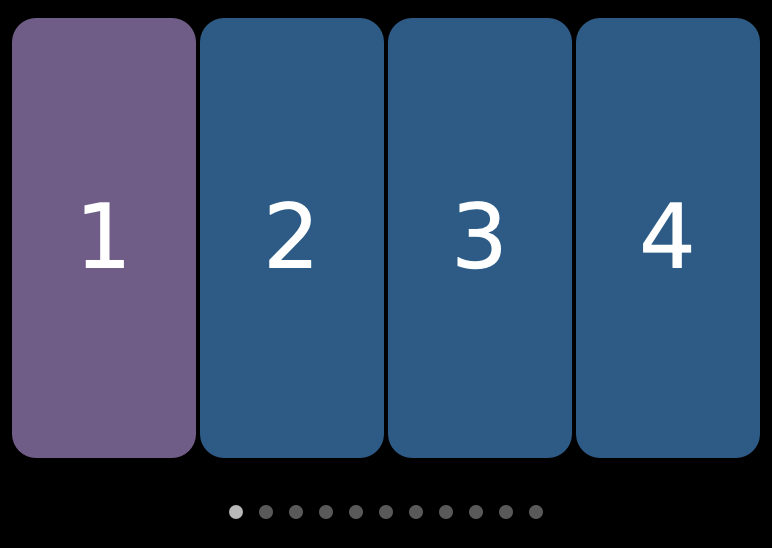
The Preset Buttons are located at the center of the metronome main page, and show some settings of the preset such as meter and bars to play.
Loading
To load a preset, tap on a preset button.
Create a New Preset
To create a new preset, tap the List icon and choose Add New Preset. A new preset button will be added to the end of the preset group.
Edit a Preset
Double tap or long hold on the preset button to edit the new preset. In the edit menu, you can change any of the Metronome Preset Options described below.
The arrows at the bottom left and right of the preset editor will change which preset is being edited quickly, without having to go back to another screen. If you are on the last preset in the group, pressing the + button in the lower right corner will quickly create a new preset at the end of the list to begin editing it.
Notes
If you change the meter before the current measure has ended, the change will take place immediately, even in the middle of a measure. If you want the time signature change to occur at the end of a measure, you must go to the metronome options icon on the Main Metronome page. Tap on options and select Change on Next Measure. Meter changes can be accomplished in a musically relevant manner, especially useful when recording the metronome.
When editing while in Preset Sequence mode, make certain after the edit is finished, the check mark should be blue or toggled to blue. Then you can test the changes you just made to the specific preset.
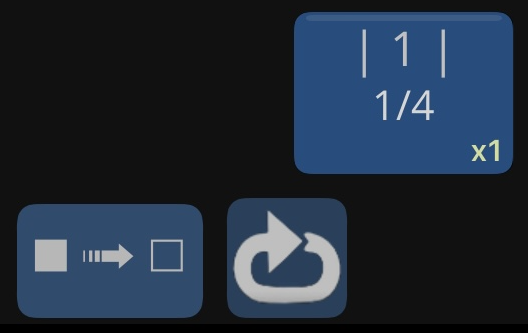
Sequencing and Looping (++)
To set a series of presets to play in sequence, simply swipe up or down on the first and last presets you wish to play for your sequence. Alternatively, long-tap on presets to set them as the range start, end, or the clear the range.
Tap the Preset Sequence (◼︎➟◻) button to enable your chosen presets to play in sequence.

Tap the Loop Button to allow the sequence to loop over.
If you swipe on a single preset, only that preset will be looped, which is particularly useful when it is configured to have a Relative tempo change, so that you can set it up to continuously speed up or slow down the metronome over time for practice purposes.
When in Preset Sequence mode, the main meter, subdivision, and beat controls cannot be used to change the settings of the metronome (as they are controlled by the presets themselves). A popup warning you of this will appear if you attempt to, allowing you to either bring up the preset editor for the current preset, or turn off the Preset Sequence mode.
Another very useful feature of the Preset Sequence mode is being able to change the relative tempo of the metronome as a whole, which is especially useful when the presets contain specific tempos and tempo changes within them. If you tap the tempo text of the metronome when Sequence mode is enabled a Tempo Adjustment popup will appear letting you make % adjustment to the tempo, and showing you the original and adjusted tempos in BPM. You can select if the adjustment will apply to the entire group (the default), or only the selected range or selected preset. These adjustments will be retained until you come back here and press the Turn Off Tempo Adjustment, which resets it to no adjustment. If you choose the Make Adjustment Permanent it will confirm, then actually make changes to the tempos in the preset(s) so that they will have the adjusted values permanently.
The Tempo Adjustment feature is useful when temporarily rehearsing a sequence of metronome presets slower or faster than they were programmed.
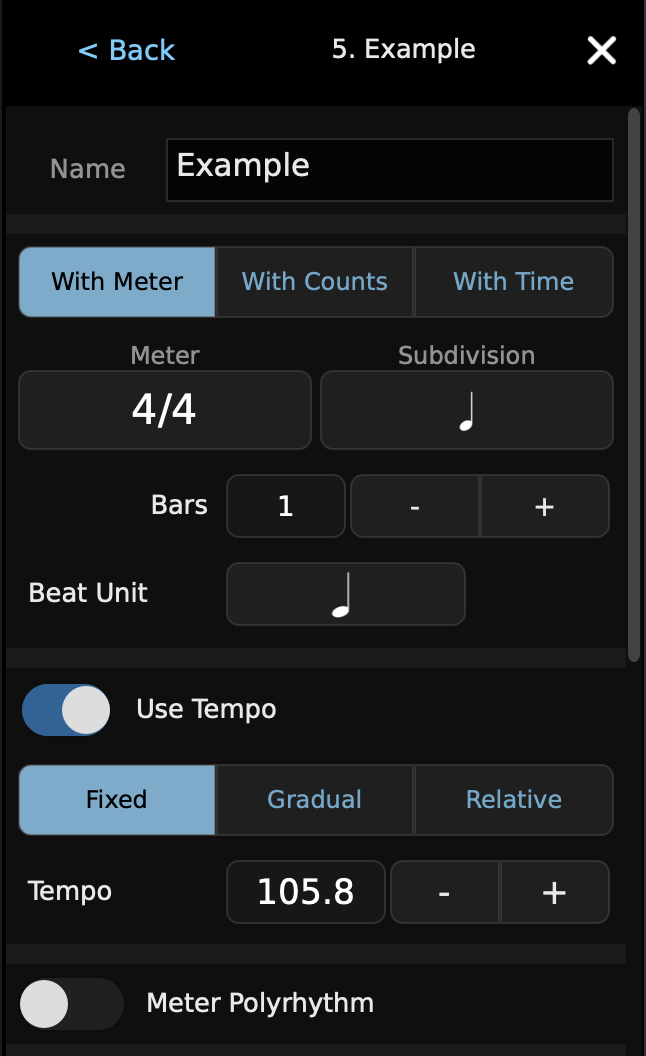
Metronome Preset Options (++)
Name: Custom name for the preset.
Meter/Counts/Time: Provides 3 options to program a preset.
- With Meter: scrolling list appears, select the following:
- Meter
- Subdivision
- Number of Bars the preset should last when in sequence mode
- Beat Unit
Bars: Tap to type in a length, or use the +/- buttons.
- With Count: allows you to determine:
- a 1/4 or 1/8th note Count Unit
- a Subdivision
- the number of Counts within the preset
- a Duration in Bars (for labelling)
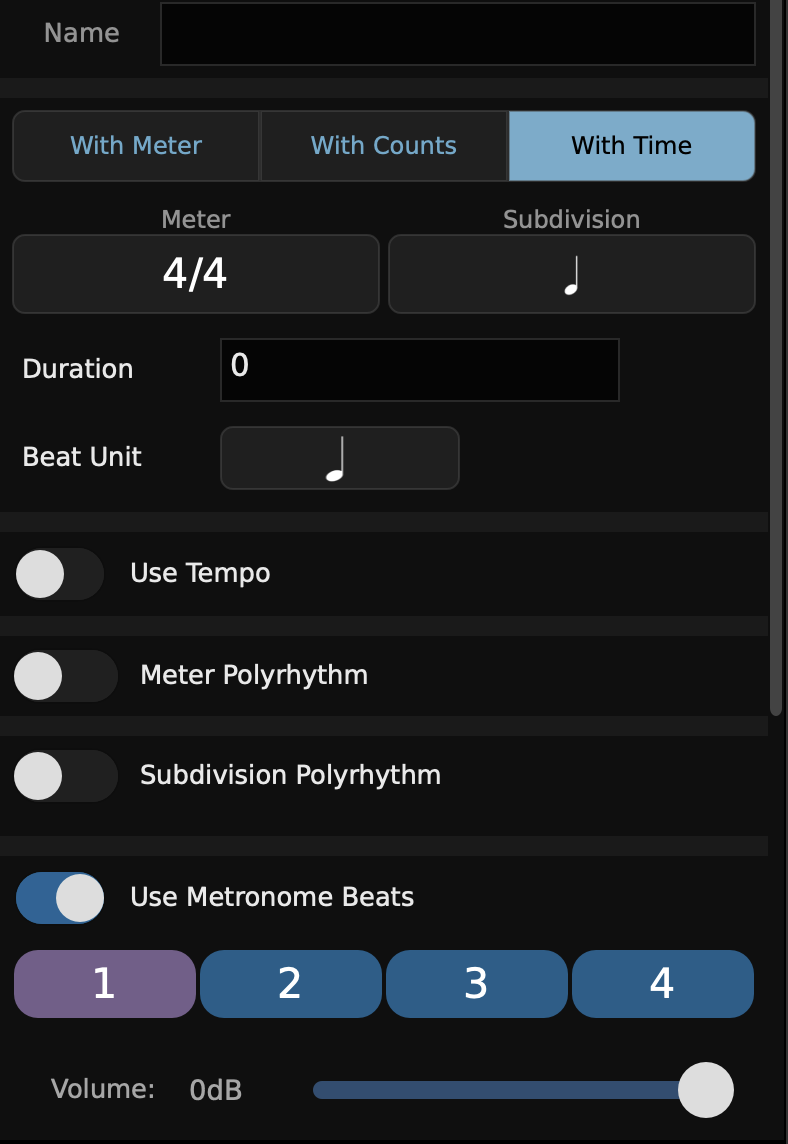
- With Time: allows you to control:
- Meter
- Subdivision
- Duration of Time the preset should last
- Beat Unit
Duration: Tap to set the time in minutes / seconds
- With Meter: scrolling list appears, select the following:
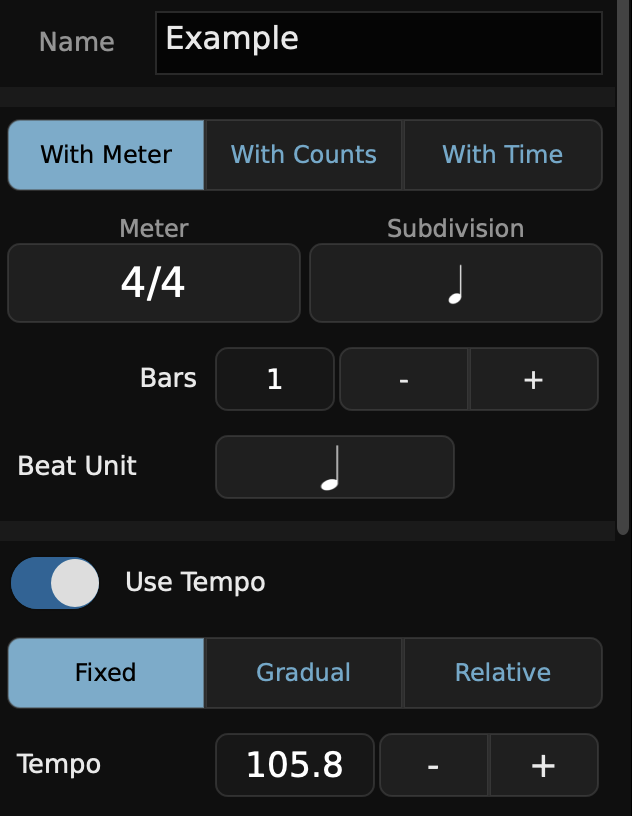
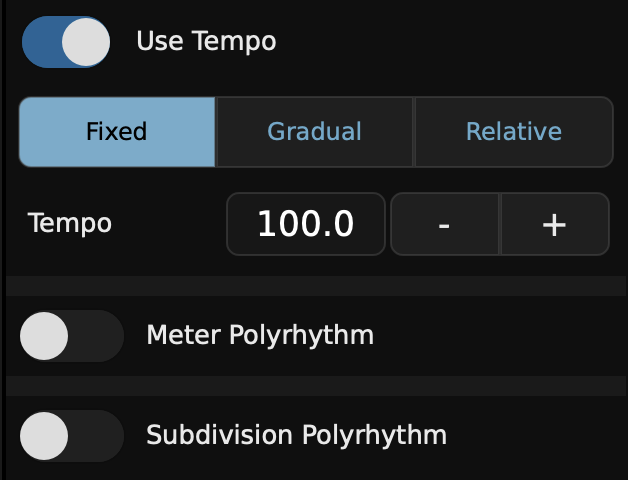
Use Tempo: There are several ways tempo can be specified in a metronome preset. The options are:
- Fixed, which will set the tempo of the metronome to this value when selected or reached in sequence mode.
- Gradual, which allows you to specify an accelerando or ritardando, by selecting a specific starting and ending tempo, and how the tempo changes within the duration of the preset. The tempo will adjust slightly on every beat, for the duration specified in the Transition Beats control, either from the beginning or before the end of the entire preset duration. This feature only works when the metronome is in the sequence modes.
- Relative, is similar to Gradual except that instead of specifying a specific start and end tempo, you specify the BPM adjustment (positive or negative) that is desired across the selected duration.
If the Presets Change Tempo option in the Metronome Options is disabled, then the tempos will not be changed regardless of how they are configured in the preset.
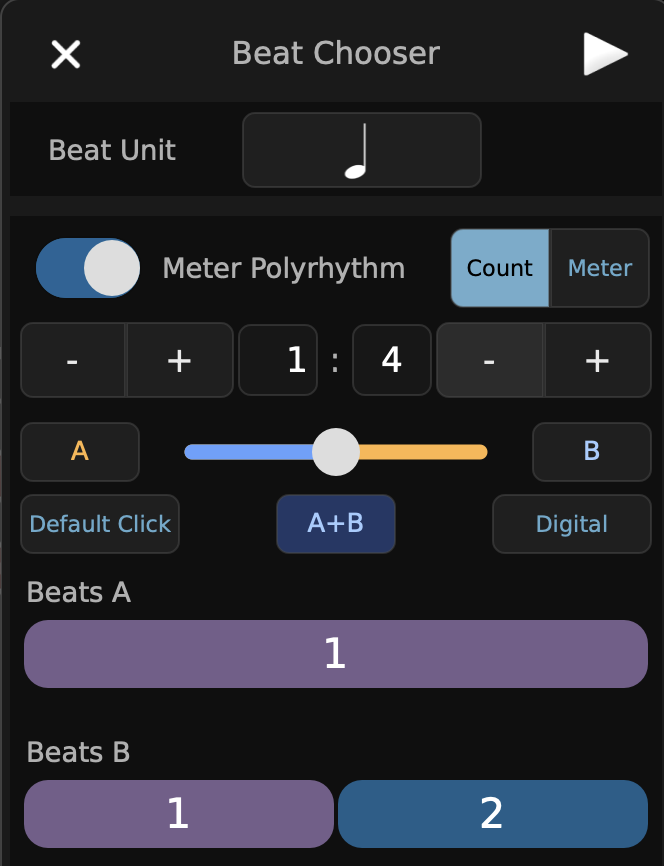
Meter Polyrhythm Two different meters are played at once to create a polyrhythm. Select from either Count or Meter mode and use the orange slider to set the volume of each. Tap on the A or B buttons to hear either in isolation.
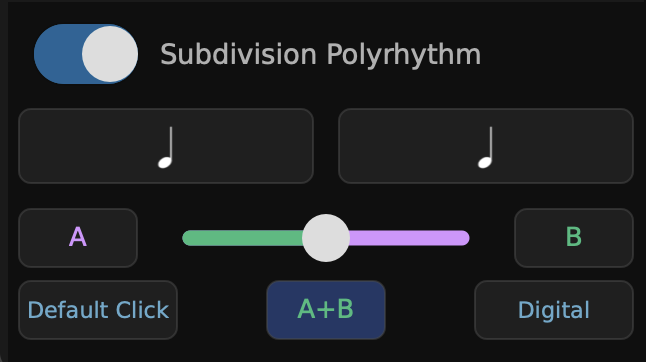
Subdivision Polyrhythm Similar to the meter polyrhythm, but for subdivisions. An additional function is available to play different sounds for each. Tap on the box below the A or B buttons to select a sound.
Use Metronome Beats Tap on any of the beat squares to silence, play, or accent that beat. A volume slider is provided for metronome beats volume, as well as options for random beat silencing.
Use Voice Count A human voice counts along with or instead of the metronome sound. Your three options are:
- Mute
- Standard Voice
- Accented Voice
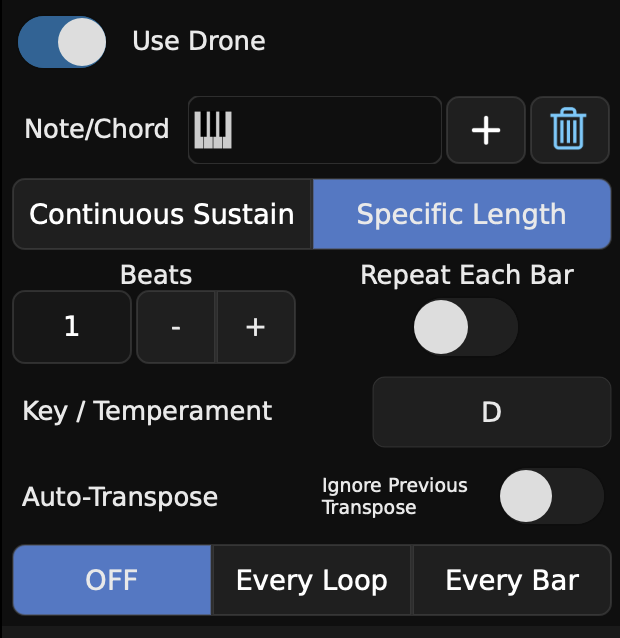
Use Drone
- To add a note/chord to your drone:
- Tap the blue +
- Tap in the individual note(s)
- To delete an individual note, tap the purple highlighted note on the keyboard.
- To delete all the chosen notes, tap the delete (trash can) icon.
- Determine the length of your drone by selecting either Continuous Sustain or Specific Length:
- Continuous Sustain: the note/drone will be heard throughout the entire preset.
- Specific Length:
- Beats: use +/- to choose how many beats you want to hear.
- Repeat: Each Bar - toggle on/off
- Key/Temperament: To access your choices, tap the white arrow on the right side of screen.
Enabling this function will lock in a specific key/temperament as you move from one drone to the next.
- Select a key by tapping on the note.
- Choose flat or sharp notation.
- Choose Major or Minor.
- Select a temperament override:
- None
- Equal
- Alternate
- To add a note/chord to your drone:
Auto Transpose If switched to Every Loop or Every Bar, this option will automatically transpose the drone by your chosen interval, scale or circle of fifths. Various options exist to set direction, root key, octave limit etc.
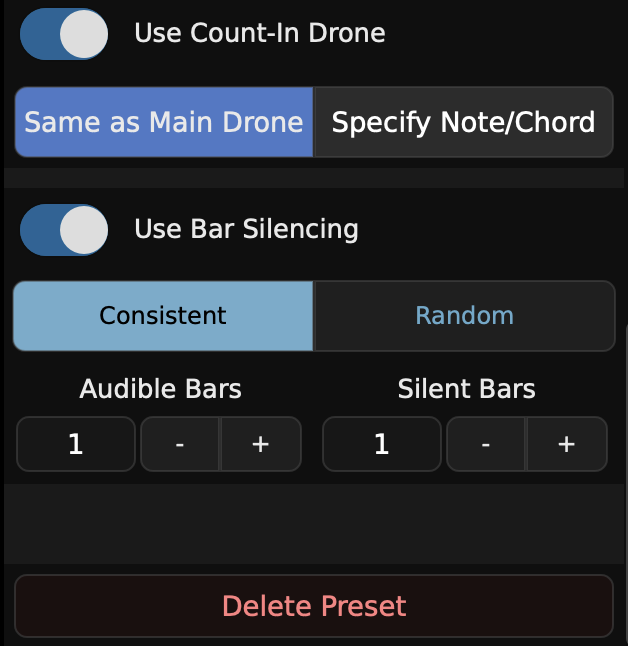
Use Count-In Drone Toggle on and two choices will appear.
- Same as Main Drone
- Specify Note/Chord
Allows you to add a drone or add a different Note/Chord during the Count-In than in the preset drone. Refer to Use Drone instructions.
Use Bar Silencing allows you to mute bars in one of two different ways. This applies to just the preset on which you are working.
Consistent
- Audible Bars: tap +/- to select number
- Silent Bars: tap +/- to select number
Random: You can choose one or all four of the following to program. You have the ability to set the customization parameters for Use Bar Silencing.
- Audible Bars Max
- Audible Bars Min
- Silent Bars Max
- Silent Bars Min
You can also tap on any number to change it.
Delete Preset Delete this preset (requires confirmation).
Metronome Preset Groups (++)
Metronome Preset Groups are a handy option for bunching together a set of presets. For example, you may create one group with a variety of polyrhythms to practice, and another group with popular meters and voice count-ins.
A full-screen Preset Groups Editor is provided to edit and organize Preset Groups.
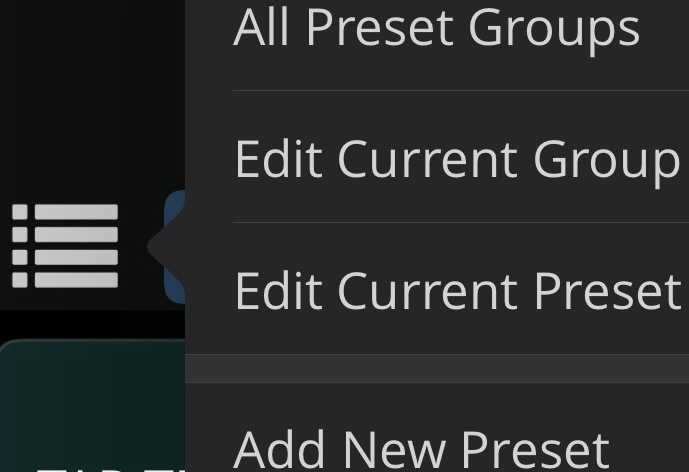
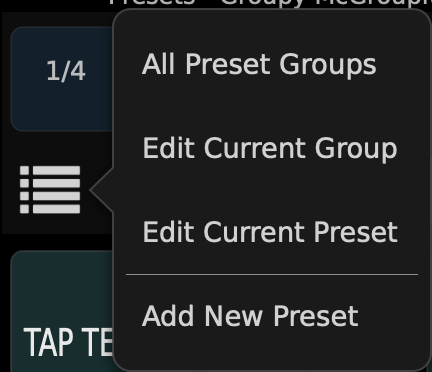
Tapping the List Icon on the left hand side of the screen opens the Preset Groups Menu. Four options are available:
- All Preset Groups: Opens the Preset Groups Editor with a list of all Preset Groups on the left hand side.
- Edit Current Group: Opens the Presets Editor with a list of the current group’s presets on the left hand side.
- Edit Current Preset: Opens the editor for the currently selected preset.
- Add New Preset: Creates a new preset with the same settings as the currently selected preset.
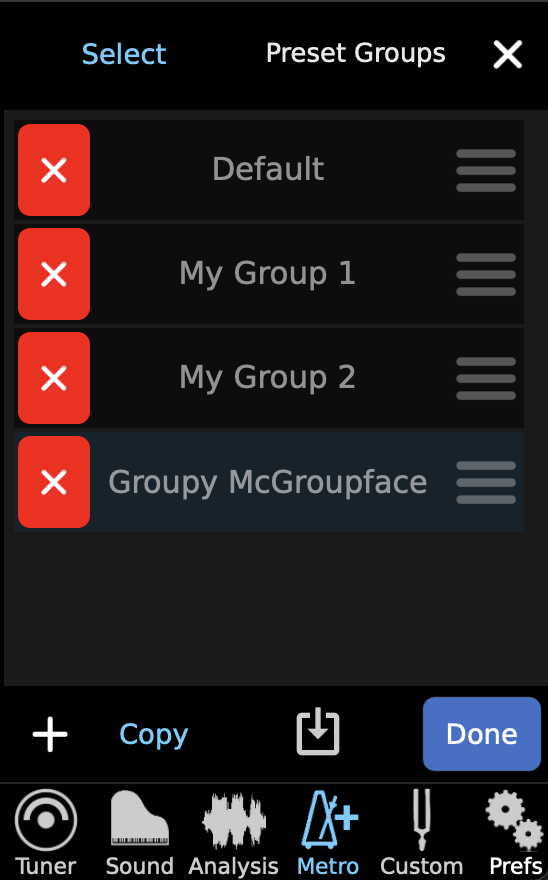
Preset Groups Editor (++)
The Preset Groups Editor is a panel containing a list of “My Preset Groups”. At the bottom of the panel are a variety of functions to add, copy, play and edit these Preset Groups.
Create a new Preset Group
Tap the + sign in the lower left corner.
Edit the list of Preset Groups
Tap the Edit button at the bottom of the Preset Groups Editor. The list of Preset Groups will change appearance, with red circles on the left and three lines on the right. Tap on a red circle to delete a Preset Group (you will need to tap again on Delete to confirm.)
Tap and hold the three lines on the right hand side to grab a Preset Group. You can then drag it to another location in the groups list.
To delete a group, tap on red circle with — sign. Tap Delete. You can delete multiple preset groups at once by using the Select mode as described above for exporting, and using the trashcan icon.
To copy a preset group, tap the name of the group you want to copy. Tap Copy in the lower left corner of the Preset Groups page.
To combine multiple groups together into a single new group, use the Select mode as above, select the groups you wish to combine, then press the ◻︎+◻︎ button. A new group will be created where the items from each will be included in order in a single group.
Export one or more preset groups to share with others
Select the group or groups you wish to share. Press the export icon (leftmost in toolbar). This will bring up the standard iOS sharing interface allowing you to export it in various ways (AirDrop, email, Files, etc).
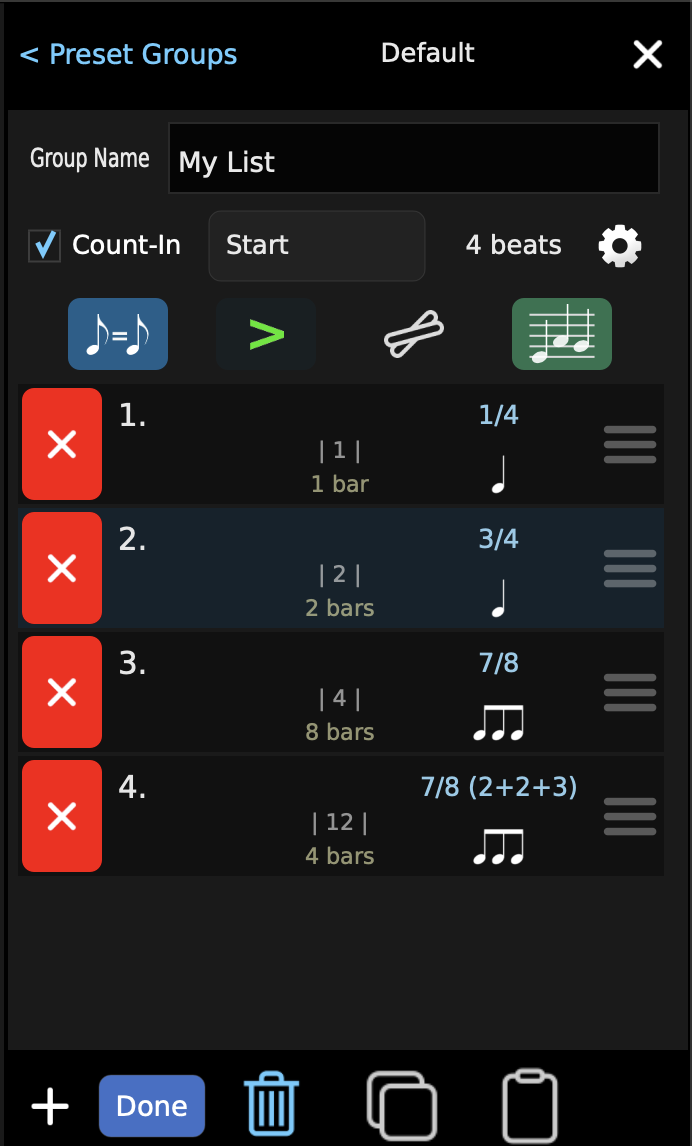
Presets List Editor (++)
The Presets List Editor is for editing the list of Presets within a Preset Group. At the top is the name of the group (which can be edited by clicking on it and typing in a new name). Below that is a Count-In setting for the group (described further below), and then a list of the presets contained within that group. Here you can add new presets, remove unwanted ones, re-order them, and set the range for playing back multiple presets in sequence.
Create a New Preset

While using the Presets editor, an alternative option exists to create new presets. At the bottom of the Presets Editor, there is a plus (+) button and an Edit button. Tap the (+) button to insert a copy of your currently selected (highlighted) preset bar beneath that preset bar in the list. This will also copy the highlighted preset’s settings, except for its name. You can adjust the settings to your liking for the new preset.
Copy and Paste


To Copy and Paste one or more presets within a Group, tap Edit. Then highlight, by swiping, the preset/s you want to copy. Tap on the Copy icon (two pages) at the bottom. A note will appear letting you know how many you selected. Then tap the Paste icon (clipboard). The selected presets will be pasted directly below the last chosen preset. If you want to relocate your selected preset/s in a different location, after you have copied the desired preset/s, tap the preset you want the copied preset/s to be inserted under. Then press the Paste (clipboard) icon.
Move Presets

To rearrange the order of presets, press the Edit button in the lower left corner of the presets area, then use the drag handles (3 horizontal bars) on the right edge of the preset items to rearrange them. Click and hold the drag handle then drag the preset to the desired insert point.
Count-In
At the top of the Presets List Editor, below the name of the group, is an option for group Count-In.
Note: Please refer to the Count-In documentation for a full description of how Count-In works.
To access and edit the full Count-In settings, press the circled (i) button to the right of the Count-In toggle.
You can also choose when you want the Count-In to occur. By default this is set to Start, but can be changed to:
- Start
- Range Start
- Each Preset
- Each Bar
- Count-In Only (Hear the Count-In but not the metronome.)
Editing Presets
Note: On the iPhone, to edit an existing preset in the Presets List Editor, you will need to either double-tap the item, or tap the information icon (circle i), then make your changes on the screen and return to the previous screen.
Note: Once all your presets are created and in the order you want, when you tap the Preset Sequence icon and engage the metronome, the metronome will move from one preset to the next in sequential order.
TE Tone Generator (Sound Page)
Accessible from many parts of the TE Tuner app, The TE Tone Generator can play a variety of keyboard, woodwind, brass and string sounds. The TE Tone Generator can be controlled and played from the Sound Page.
Selected instruments or sounds will be played on all pages until changed.
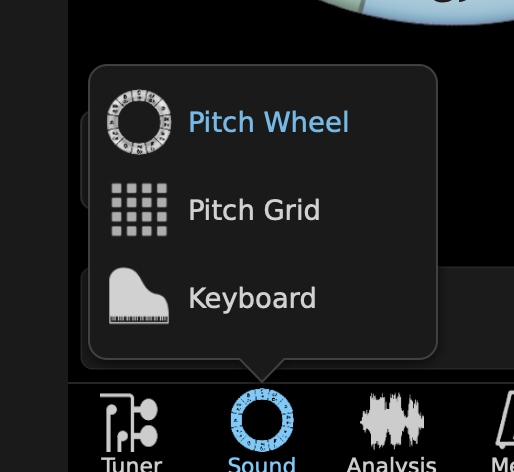
There are 3 options for playing the sounds:
- Chromatic Wheel
- Piano Keyboard
- Pitch Grid
Tap the Sound icon at the bottom of the app to choose from these options.
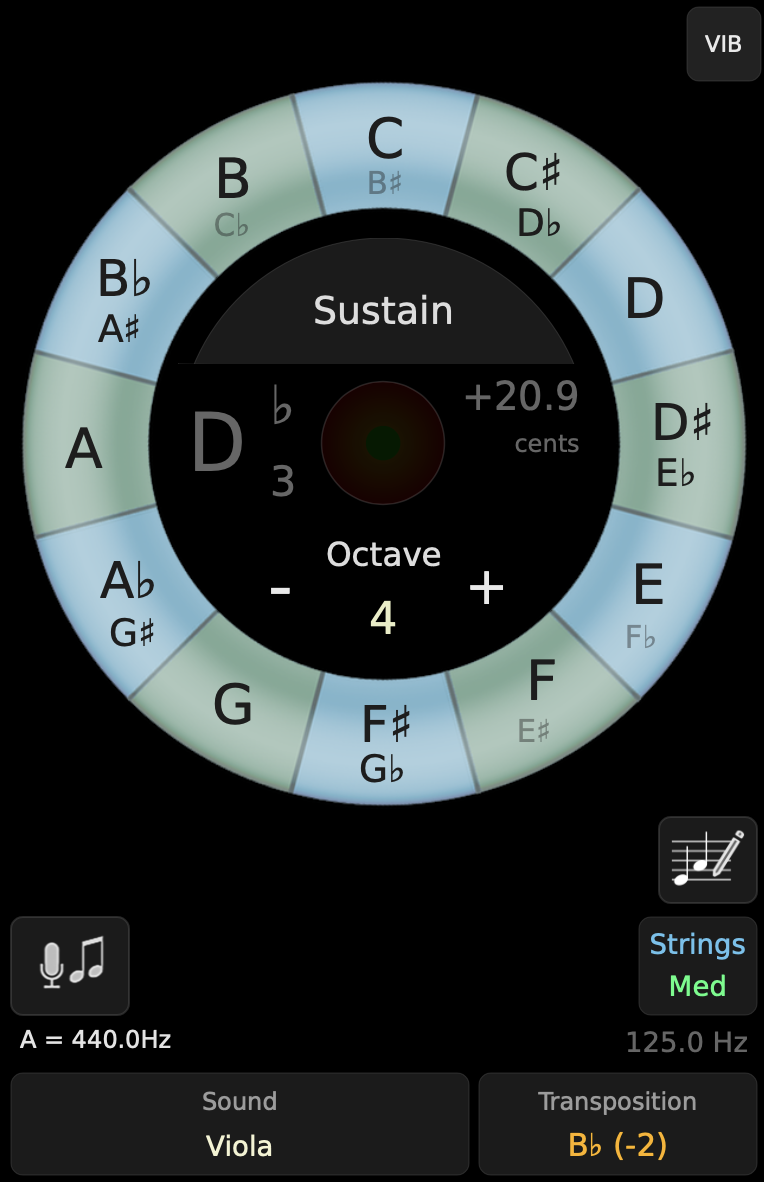
Chromatic Wheel
To activate the Chromatic Wheel , tap the Sound icon in the page selection bar at the bottom of the page and select Pitch Wheel.
Refer to the Auto Exercise Creator (AEC) for a complete explanation of how the AEC works with the Chromatic Wheel.
There is also a simplified chromatic wheel on the main Tuner page, which can play one note at a time, or can sustain a single note when a note is pressed and held briefly. Tapping the center or the selected note again will silence it.
Tap a note to play a particular pitch. The note will sustain until you release it.
The practical instrument range has been predetermined. Depending on the instrument, extended higher and lower ranges have been added. The instruments will not make a tone beyond their extended ranges.
As you tap notes around the wheel, the tone generator will stay within the same octave indicated on the screen. As you tap and drag around the wheel clockwise the octave ascends whereas moving counterclockwise the octave descends. The octave change occurs at C.
Tap a pitch. The next pitch you play will go to the shortest intervalic relationship, ascending or descending, thus allowing you to change octaves without having to slide over C.
After tapping and setting to just temperament, if you double tap the root of the chord/key, TonalEnergy Tuner locks the key of your choice so that you may now tune all other pitches in that key. Then any pitch that is played will be in that tonality. There will be no sustained tone unless you also then tap the sustain button. To go back to equal temperament, tap the temperament button.
The target tuner is found in the center of the chromatic wheel. It displays the pitch and a cent meter. The tuner on this screen can be used as a stand alone feature or can be used with the other features available on the tone generator screen. When tuning with the chromatic wheel tone generator, you can use any one of the various temperaments.
The tone generator can sustain a note by tapping the sustain button in the center of the wheel. This button can simultaneously sustain multiple pitches, thus allowing you to create many types of chords.
- Tap the sustain button and then select the notes you want sustained.
- Tap sustain button or pitch button to release the notes.
For instant pitch reference, tap anywhere on the center bar inside the Chromatic Wheel.
The octave button has plus and minus signs. Tap the plus sign for the tone generator to play an octave higher and the minus sign to play an octave lower. You can sustain the same note in different octaves by first tapping sustain, then tapping the desired pitch. Next choose the plus sign or minus sign to change the octave, and tap the new note. If you have multiple octaves playing and desire to remove one octave, tap the pitch to release the last octave added. To delete other octaves, you must tap the + or — sign, then the pitch. To shift currently sustained notes by an octave in either direction, press and hold the octave button.
MIDI-keyboard controllers interface with the TonalEnergy Tuner. They will do anything the chromatic wheel will do.
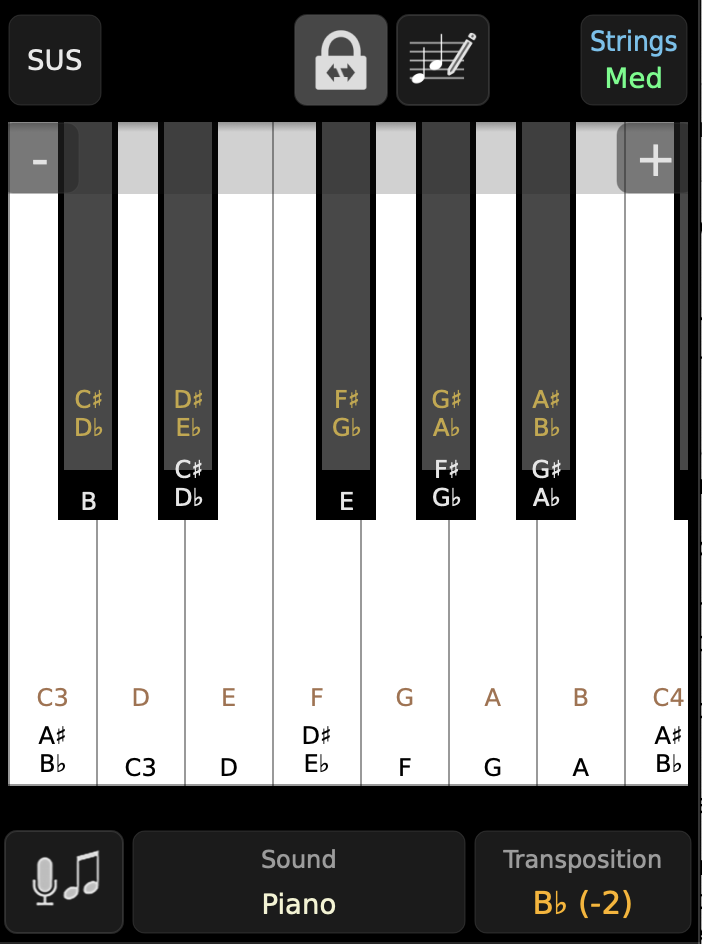
Piano Keyboard
To activate the keyboard screen, tap the Sound icon in the page selection bar at the bottom of the page and select keyboard.
Refer to the Auto Exercise Creator (AEC) for a complete explanation of how the AEC works with the Piano Keyboard.
The keyboard functions as any standard piano.
The keyboard will only play the practical range of selected instrument.
The range of the keyboard may be changed two ways:
- Touch and slide the keyboard to the right or left. If you do not want sound, touch and drag in the shaded area at the top of the keyboard when sliding.
- The octave switches (+ on the right, — on the left) may be touched to quickly alter the keyboard range.
To change the size of the keys, use a two-finger pinch and slide movement. If you do not want sound, go to the shaded area at the top of the keyboard to pinch or slide.
Once the keyboard range is selected, tap the keyboard lock icon to prevent the keyboard from moving.
The keyboard changes to reflect the transposed instrument note name. For example, Eb transposing instruments will show their C in brown on the keyboard’s C key. The corresponding concert pitch name is displayed as a gray letter on the piano’s C key. In this example, concert Eb would appear on the keyboard’s C key. When a transposing instrument has been chosen, You are reminded by the word Transposed displayed on the screen in orange.
Press the Sustain toggle to sustain up to 14 pitches anywhere on the keyboard.
Like a MIDI keyboard, the Chord Hold function can also be used with the built-in keyboard. First press the Sustain button and then press the Chord Hold button, which appears directly to the right of the Sustain toggle. In equal, just or custom temperaments, three different pitches may be played.
The Sustain Hold is most helpful using Just intonation while playing major or minor triads, as the tuner will recognize what chord is being played regardless of the inversion. The tonality or key center for major and minor triads will be a highlighted purple piano key.
Double tapping a key will set the tonal center of the scale if you are in one of the custom temperaments (like Just).
For instant pitch reference, tap the tuning bar at the top of the keyboard page. To sustain the pitch reference note, long press. To release, tap on the tuning bar.
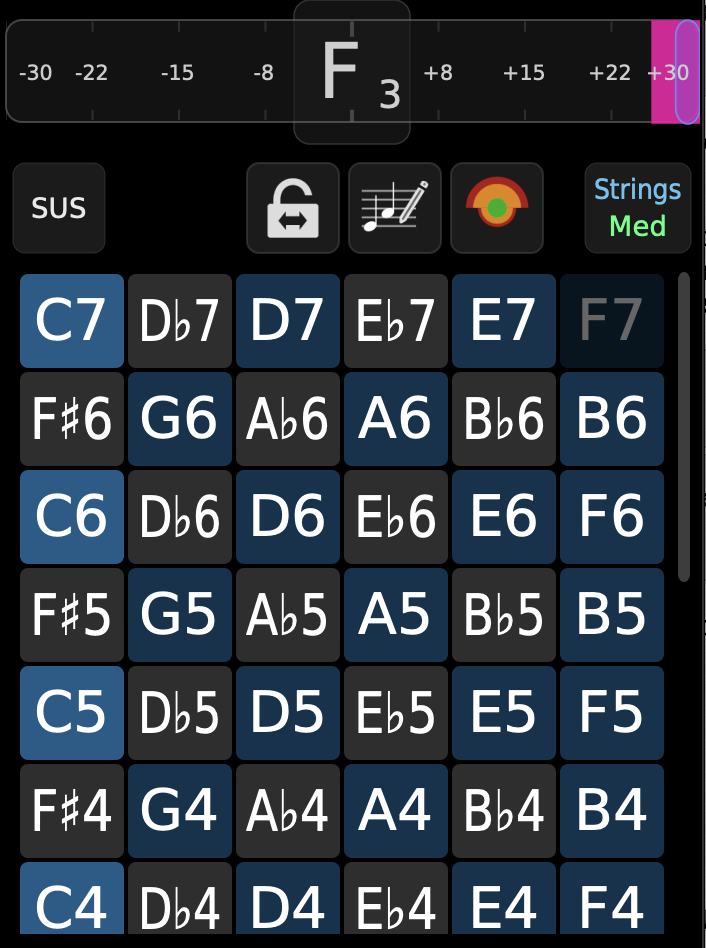
Pitch Grid
Allows you to have immediate access to the entire range of a specific instrument.
Refer to the Auto Exercise Creator (AEC) for a complete explanation of how the AEC works with the Pitch Grid.
To activate the pitch grid screen, tap the Sound icon in the page selection bar at the bottom of the page and select Pitch Grid.
The Pitch Grid function shows the lowest note of the instrument range in the lower left hand area of the screen while the highest note is found in the upper right hand area of the screen. The Pitch Grid shows all chromatic pitches within any given range of your selected instrument.
The Pitch Grid will only play the practical range of your selected instrument.
The Pitch Grid will highlight in blue all the notes of the interval or scale/chord/exercise that you have chosen.
Once the Pitch Grid range is selected, tap the Pitch Grid lock icon to prevent the Pitch Grid from moving.
Sustain

- Tap the sustain button (SUS) and then select the pitches that you want sustained.
- Tap the sustain button again to release all notes at the same time.
- Tap a sustained pitch again to release just that pitch.
- Previously sustained notes can be re-triggered by long pressing the sustain button to switch it back on.
Chord Hold

Like a MIDI keyboard, the Chord Hold function can also be used with the Pitch Grid. First press the Sustain button and then press the Chord Hold button, which appears directly to the right of the Sustain toggle. In equal, just or custom temperaments, up to six different pitches may be played. If you want to sustain two or more notes in Chord Hold, you must tap the notes simultaneously.
Double tapping a note will set the tonal center of the scale.
For instant pitch reference, tap the note name on the horizontal tuning bar. To sustain the pitch reference note, long press. To release, tap on the tuning bar.
Range Lock

Once the Pitch Grid range is selected, tap the Range Lock icon to prevent the Pitch Grid from accidentally scrolling or moving.
Tuning Statistics

Tap to show tuning statistics for your present session (Refer to Pitch Tracker). Long press to clear your most recent statistics.
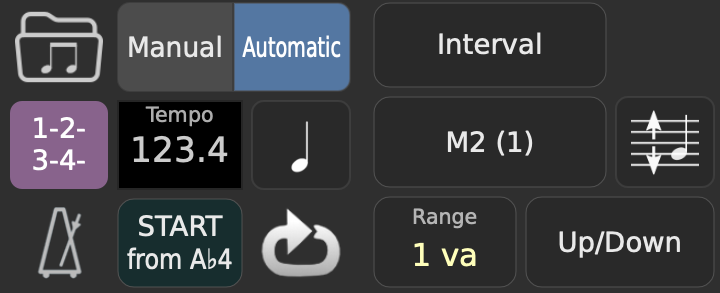
Auto Exercise Creator

Icon includes a staff with notes and a pencil. It is found at various places in the Sound page, depending on your layout (Chromatic Wheel, Piano Keyboard, Pitch Grid).
The Auto Exercise Creator (AEC) allows you to manually or automatically create various types of common interval/scales/chord exercises.
Tap either Manual or Automatic to choose the desired mode.
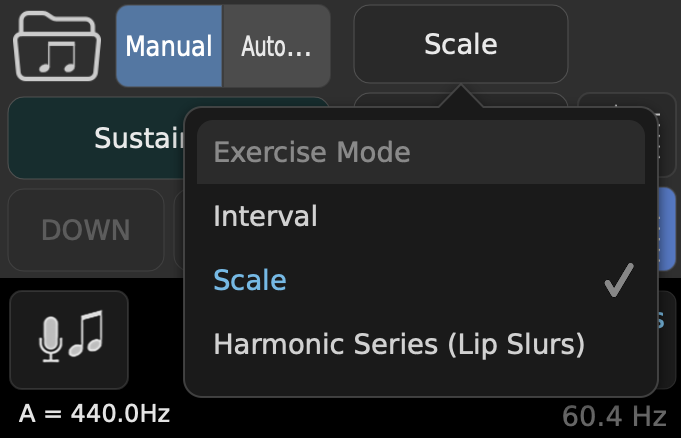
In either mode, Select the type of exercise: Interval, Scale, or Harmonic Series (Lip Slurs)
Interval:
- Choose the interval by tapping the box with the interval’s abbreviation on it (eg m3, M7).
- Press Done.
Scale:
- Tap the area below the Interval/Scale buttons to select the desired scale/chord/exercise pattern.
- Scroll up or down to find the desired pattern.
- Choose your Scale/Chord/Exercise.
- Press Done to exit.
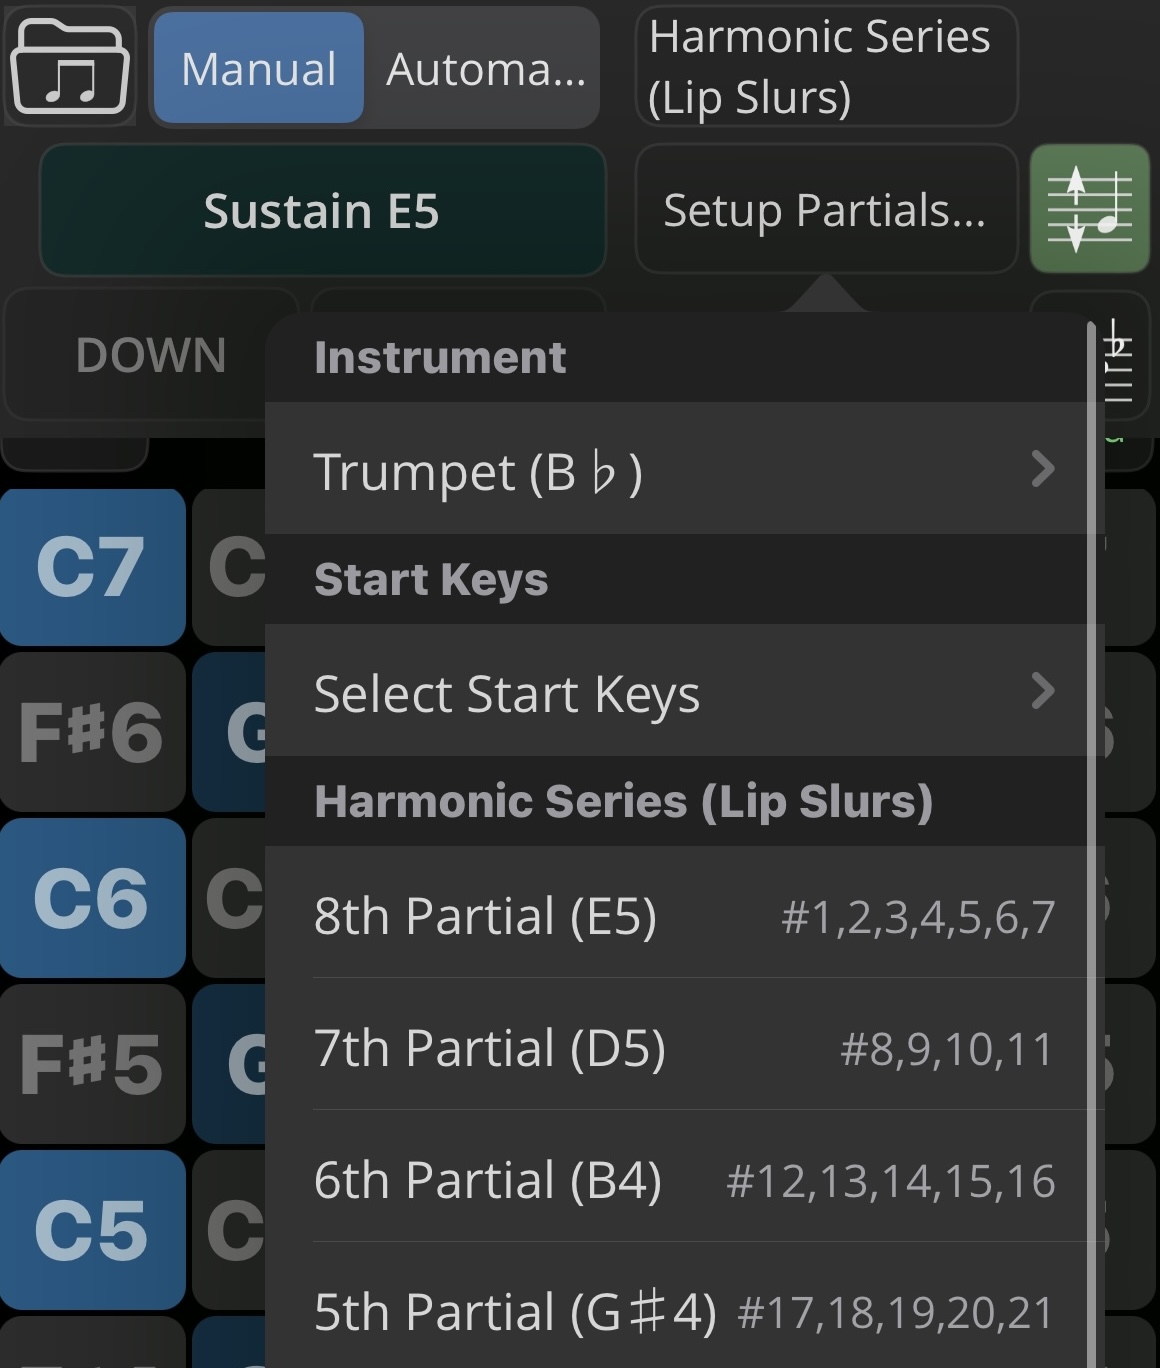
- Harmonic Series (lip Slurs)
- Tap the Setup Partials… button to select your instrument, keys to practice, and intervals to play.
Note: At least one key must be selected in order to create the exercise.
- Multiple keys can be selected, tap as many as you wish to practice, they will be played in order.
- Multiple partials can be selected to play in sequence. Tap partials in the order you wish to practice them.
- Clear Items button removes all partials.
- Options are available to play intermediate partials, and also to show high and very high partials if required.
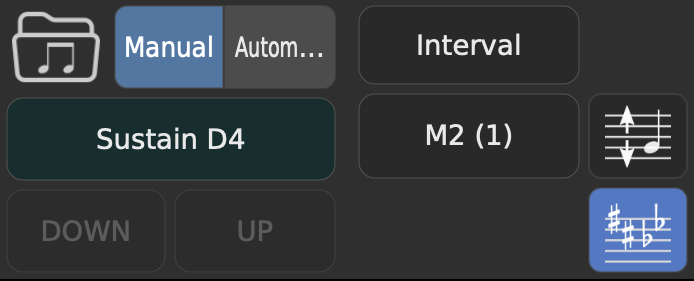
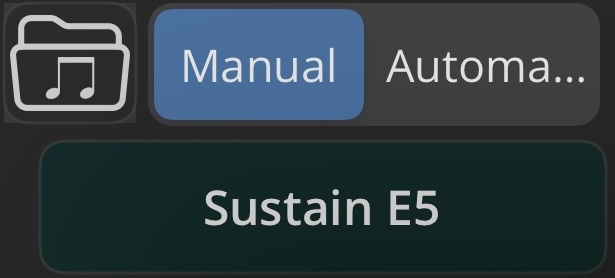
Manual Mode
- To hold a note, tap the green Sustain button with the note name found under the Manual and Automatic buttons. This Sustain button functions differently than the SUS button.
- Use the DOWN and UP buttons to manually progress through each pattern of the exercise.
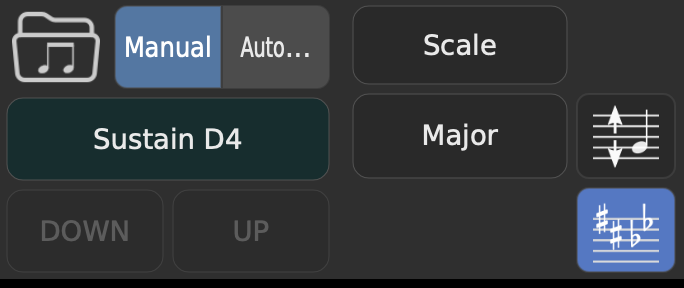
Key Signature
The Key Signature Icon, a staff with sharps and flats, is located on right side of the AEC view.
When the icon is off, your chosen key signature is locked in. When the icon is tapped and turned on, the key signature changes automatically when using the up and down buttons. This works no matter what temperament is selected.
Automatic Mode
Start
- To play an exercise, tap the green Start button with the note name found under the Tempo selector.
Count-in
- Tap the icon to turn on.
- The count-in only works at the beginning of the exercise.
You can access count-in feature controls by long pressing the count-in icon. Otherwise it will default to the previously selected count-in choice.

Metronome
- Tap to switch metronome sound on/off.
Tempo
- Tap the tempo button.
- Type the tempo into the numerical keyboard.
- Tap DONE.

Note length
- Tap the note icon to the right of the Tempo box.

Looping
- Tap the Loop button if you want the exercise to repeat.
Range
- The Range Button to the right of the Loop button allows you to determine the range of the interval/scale/chord/exercise pattern.
- This option is only for interval or scale exercises.
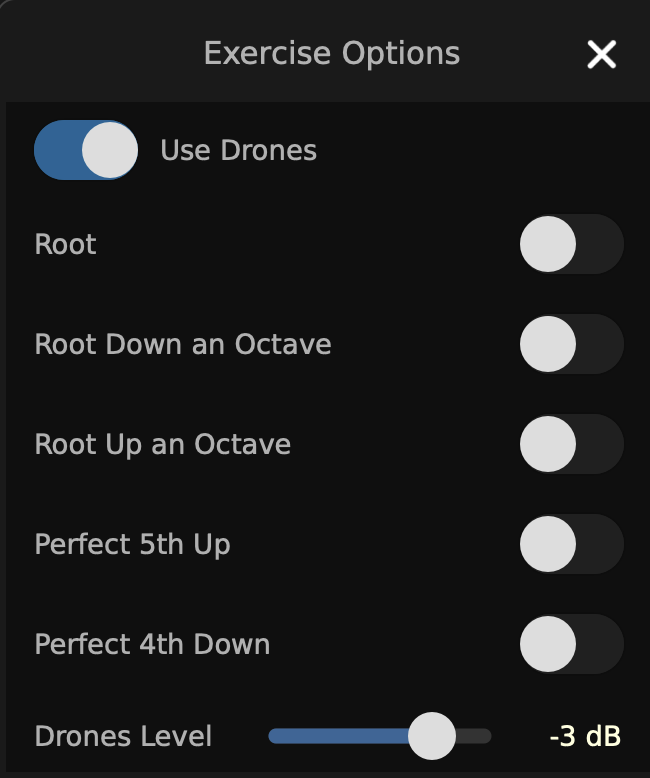
Settings (Use Drones / Transpose Every Repeat / Remain in Key)
Tapping the staff with up/down arrows brings up a range of options:
- Use Drones:
- Tap the toggle to the left to enable / disable the playing of drones together with the exercise.
- Toggle which drones to use, and adjust their overall volume with the Drones Level slider.
- Transpose Every Repeat:
- To enable, toggle the switch.
For Interval/Major Scale/ Circle of Fifths, all have the following selections to be made
- Transpose by ascending or descending intervals using the +/- symbols
- Octave Limit using the +/- symbols establishes the number of octaves the exercise pattern will be played.
- Prevent Transposing Key-toggle on/off
- Ignore Sustained Drones-toggle on/off
- To enable, toggle the switch.
For Interval/Major Scale/ Circle of Fifths, all have the following selections to be made
If you select Chord and the Up direction is selected, the first time through the C major scale will be played starting on C, the second time through it will start on E, etc…
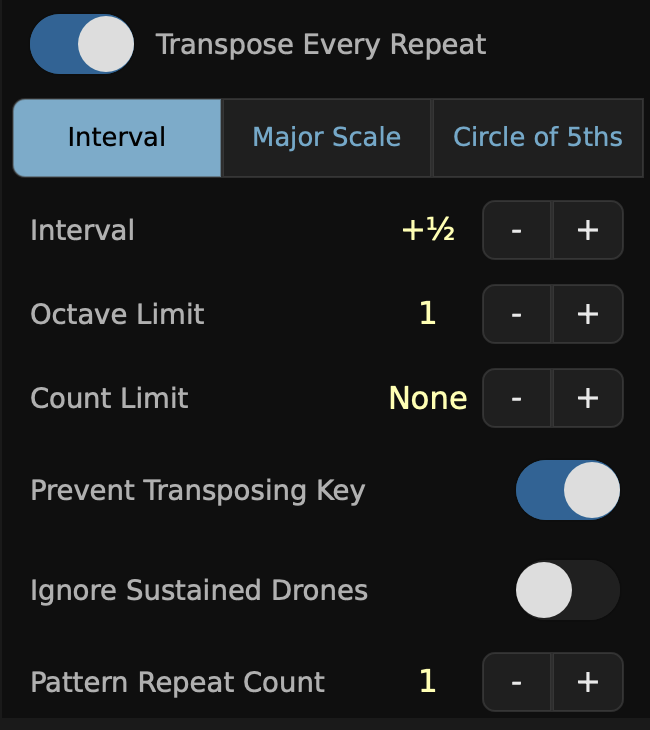
- Remain in Key - Shift Degree Every Repeat (Scale mode only)
Note: If this is toggled to the ON position, the exercise progression will stay in the originally selected key. For example, if you originally chose major scale and you turn on the Remain in Key - Shift Degree Every Repeat toggle, the exercise will no longer progress by only major scales. Turning this feature on overrides any previous choices because you have chosen to remain in one key.
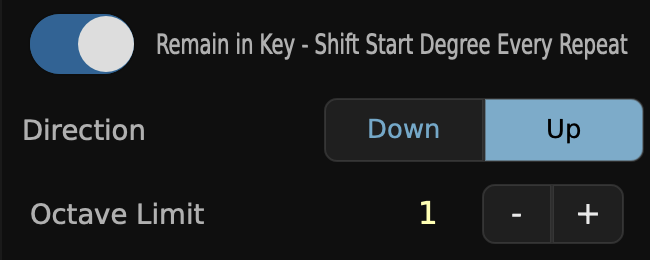
 Direction:
- This is the button to the right of the Range button. Click it to bring up options for direction of play.
- Select from Up, Down, Up/Down, and Down/Up.
- 2x Root Length: The root note will be played twice as long as the intervals.
- Intervals Return to Root: After every interval is played, the root note will be played again.
- Ensure Last Note When Looping: If looping in for example Up/Down direction, the last note will be played on both the up and down, effectively repeating it.
- Galamian Turn: Adds a galamian turn to the scale. (Scale mode only)
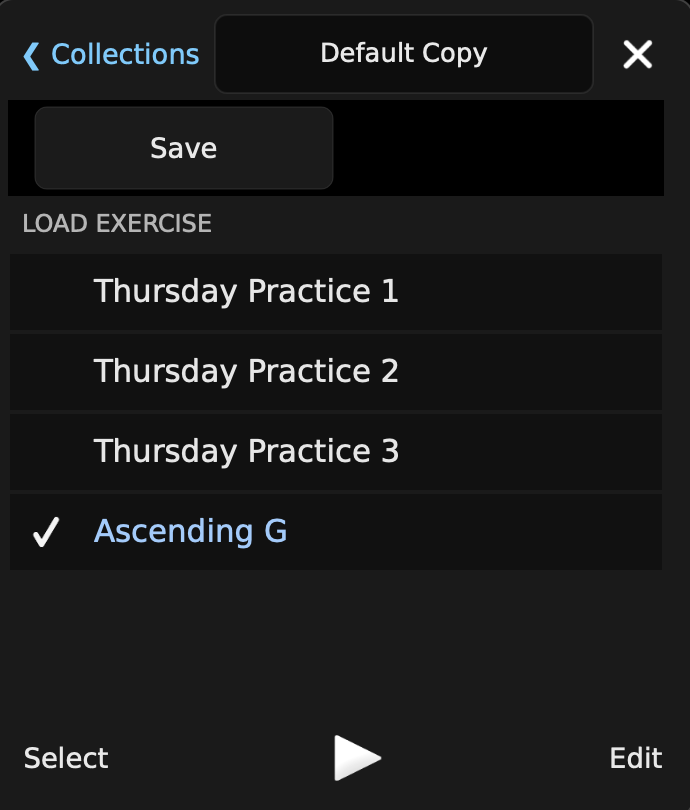
Save / Load / Edit
 Tap the folder icon to save or load exercises.
Tap the save button to save an exercise, and use the keyboard to rename it as you please.
Exercises can be played from this view by tapping the play button at the bottom.
In order to delete or export exercises, tap the Select button and choose one or more exercises. Then tap the export (box with arrow) button, or the delete (trash can) button.
Exercises can also be re-ordered by clicking the Edit button and dragging the list icon to the right of each exercise. Clicking the red X box to the left will delete the exercise.
Collections
- Exercises can be organized in collections. Tap the Collections button at the top left to go back to the collections view. Tap on a collection to open it and view its exercises. Tap the + button at the bottom of the save window to add a new collection, or the copy button to copy the selected collection to a new one.
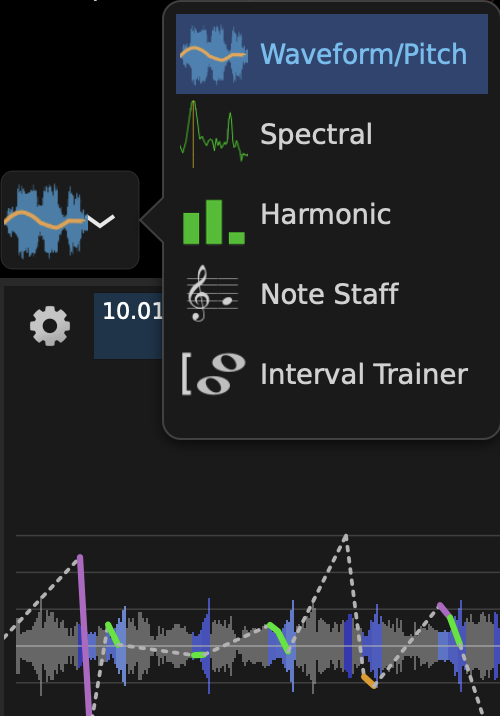
TE Analysis
To choose an Analysis view, tap the graph icon in the middle of the page on the far left. This brings up a choice to show a graphic view of your sound’s analysis. View choices include:
- Waveform
- Spectral
- Harmonic
- Note Staff
- Interval Trainer
You can swipe left or right from either screen edge of the analysis view area to switch view types.
The various views are described below.
Waveform
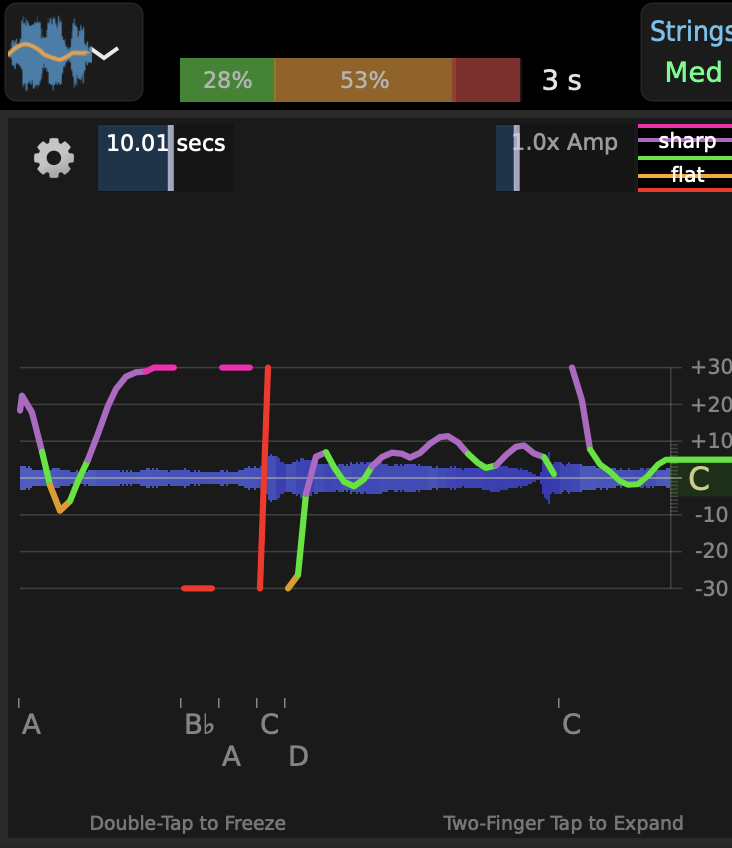
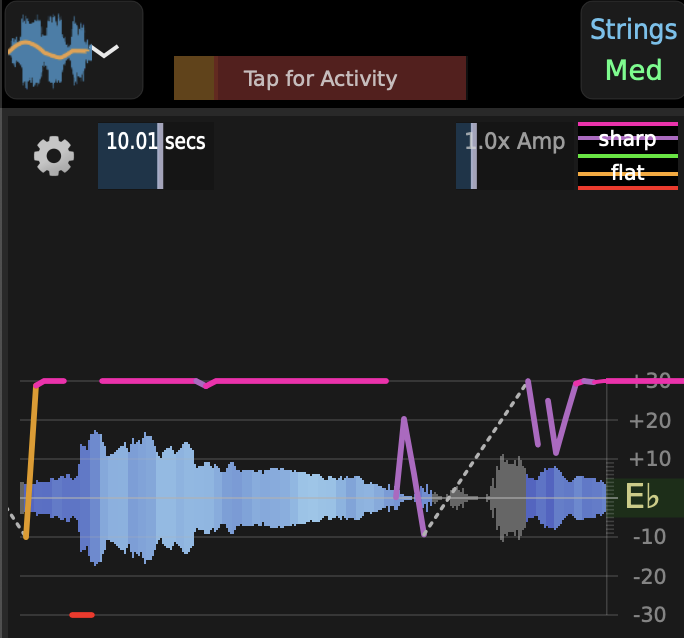
The blue waveform is an image that represents an audio signal, in this case the tone being played either on your instrument or on the internal sound. Like the spectral analyzer, it is a visual representation of the quality of your tone. Blue sound shapes will vary depending on what you are practicing. For example, when practicing decrescendos, the sound should resemble a blue triangle. The goal is to have relatively straight sides on whatever shape your sound makes. Wavy lines indicate some aspect of your sound is not as controlled as it could be. Every aspect of the quality of your tone, including but not limited to volume, start, release, duration, and steadiness, will be reflected in the waveform view.
The waveform view has various controls to freeze, zoom, play and loop the waveform:
- Double-tap to freeze the waveform while performing live or while listening to a recorded file.
- Double-tapping the view will return to normal operation, un-freezing the display and showing the current live scrolling input.
The size of the waveform can be changed manually by using the Amp slider. This enables you to change the vertical scale of the waveform.
Waveform Timespan
- This control lets you adjust the span of time shown in the waveform.
The maximum time is about 60 seconds, and the minimum time is about 20 milliseconds. This allows you to accurately see the detailed waveform like an oscilloscope.
Intonation (Plot Pitch)
When a tone is playing, the accuracy of the pitch is represented by a line which will be red, orange or green. While the goal is for the green line to run straight through the center of the blue wave form, a purple (sharp) or orange (flat) line is still considered to be within the tuning range parameters. If the pitch is out of the tuning range parameters, a red line will appear.
Note: Best practice requires you to use Plot Pitch in a quiet environment with little or no ambient sound.
To identify what pitch the tuner is recognizing, consult the bottom of the waveform screen or the pitch name beside the Target Tuner or in the middle of the Vertical Tuner Bar on the right side of the screen.
Note: Just as the smiley face grows when an in tune pitch is held, the shaded area of the Vertical Tuner Bar expands when an in tune pitch is held for an extended period of time.
White dotted lines represents the silence between pitches. When slurring or playing in a legato style, the goal is to minimize the number of white dotted lines.
Settings
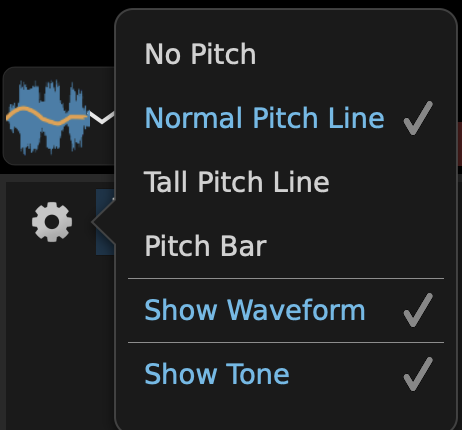
Waveform and Pitch settings can be changed by clicking the cog icon in the top left hand corner of the Waveform Window.
Several options are available for showing intonation: No Pitch, Normal Pitch Line, Tall Pitch Line and Pitch Bar.
When a tone is playing, the accuracy of the pitch is represented by a colored line:
- Green Line: The goal is for the green line to run straight through the center of the blue wave form, signaling that your tone is in tune.
- Orange Line: While slightly out, an orange line is still considered to be within the tuning range parameters.
- Red Line: If the pitch is out of the tuning range parameters, a red line will appear.
Note: Best practice requires you to use Pitch in a quiet environment with little or no ambient sound.
To identify what pitch the tuner is recognizing, consult one of the following:
- The bottom of the waveform view.
- The pitch name beside the Target Tuner.
- The middle of the Vertical Tuner Bar on the right side of the screen.
Note: Just as the smiley face grows when an in tune pitch is held, the shaded area of the Vertical Tuner Bar expands when an in tune pitch is held for an extended period of time.
White dotted lines represents the silence between pitches. When slurring or playing in a legato style, the goal is to minimize the number of white dotted lines.
Options
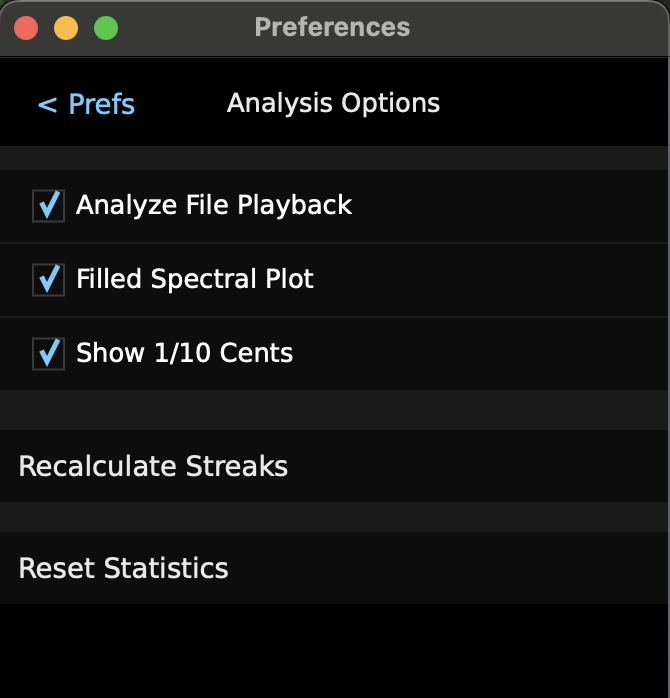
Further options for adjusting a range of Analysis page preferences are available on the Analysis Options section of the TE Preferences page.
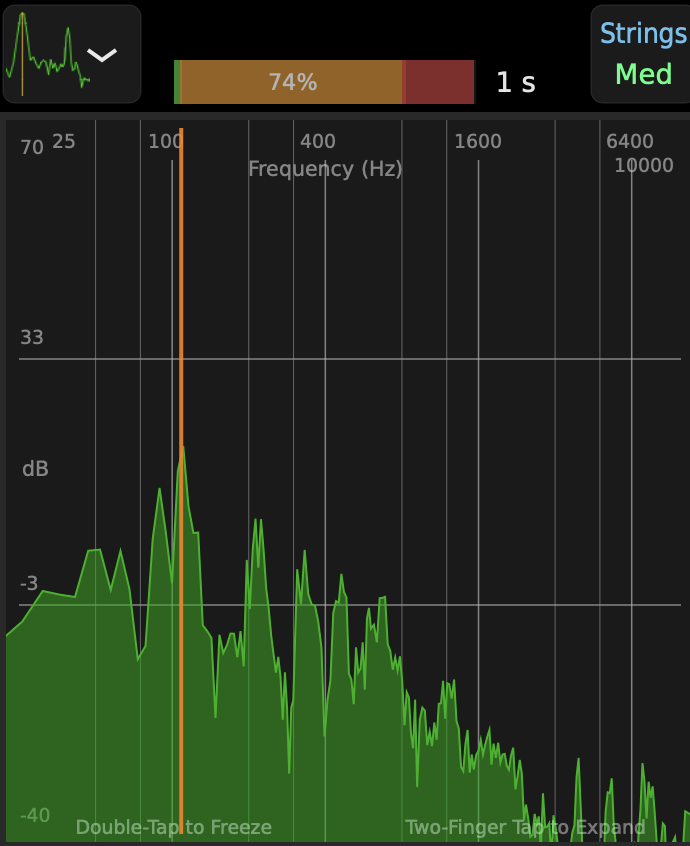
Spectral Frequency Analyzer
The spectral frequency analyzer has a range from 0 - 10,000 hertz. The vertical orange line identifies your fundamental tone or first partial. As you play, the window allows you to see whether or not your fundamental tone/first partial is your highest peak. You may choose to use a line or filled in spectral plot in the Analysis Options section of the TE Preferences page. On both the Spectral Frequency and the Harmonic Energy windows, you may double tap the screen to freeze a tone. The “frozen” tone will be blue. You may then continue playing so you can use the “frozen” pitch as a means to compare the energy and frequencies of this tone. Another useful feature of this view is the screen may be frozen while performing or listening to a recorded file.
In a characteristic symphonic wind sound, the fundamental tone/first partial should be the highest peak (orange line) while the second partial should be the second highest peak, etc. The difference between the height of the peaks is directly related to the quality of your tone. There should be less harmonics/partials on the highest pitches of your instrument. On your very lowest pitches you will see several harmonics/partials.
A two-finger tap on the plot will expand the view to fill the screen. Two-finger tapping again will return it to normal size.
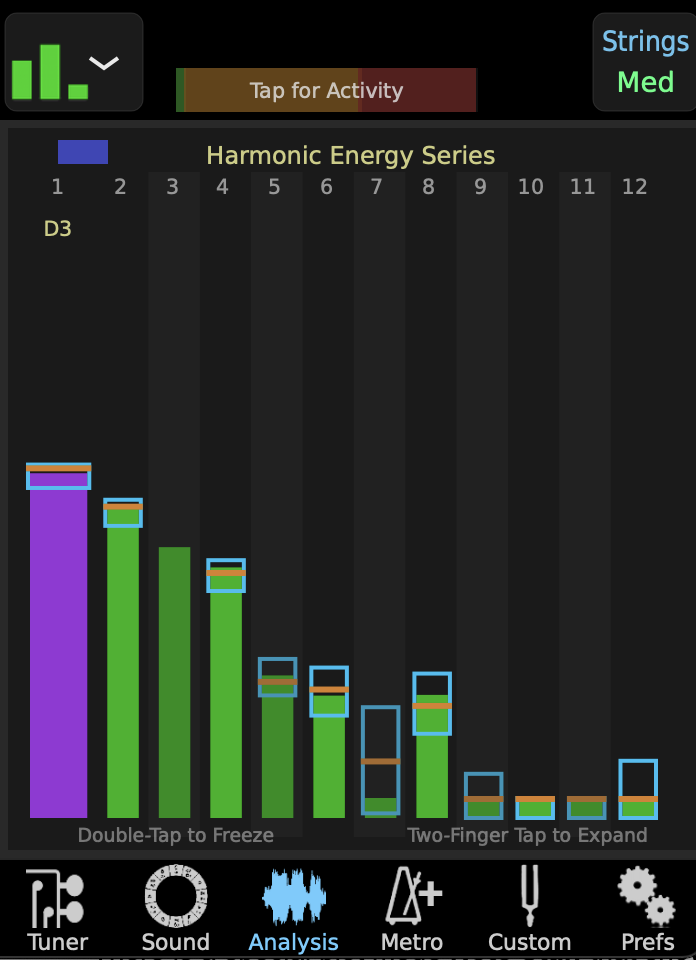
Harmonic Energy Series
The harmonic energy analyzer gives a real time bar chart of the intensity of all the partials in your tone. At the top of the view, a pitch tracker or bar graph will appear illustrating the percent of time the music performed fell into each of the three pitch zones: red, yellow, green. The colors and percentage are determined by the amount of time the tones were performed within the tuning parameters set in the Mode and Range pop-up.
Note: There are some features unique to the Harmonic Energy Series view:
- Use a two-finger pinch to reduce the number of partials.
- The names of the first eight harmonic partials are listed under the partial numbers at the top of the bars.
- The cent offsets for each partial, as they relate to equal temperament, are shown under the harmonic partial note names.
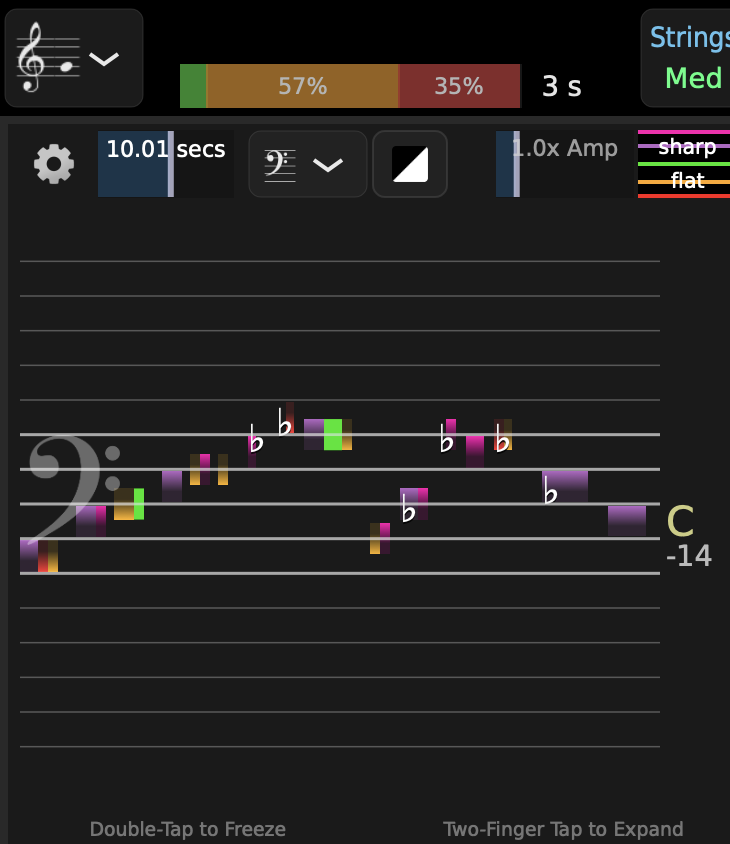
Note Staff
There is a special plot mode Note Staff that shows the pitches played over time in a notation similar to musical staff. Colored bars are shown in their positions on the choice of staff (Treble, Bass, Tenor, Alto, or Treble+Bass), along with accidentals indicated. The colors of the bars coincide with the in-tune state of the note analyzed, with green for in-tune, orange for out-of-tune, and red for very-out-of-tune. The shading indicates whether the note is sharp or flat (when the lighter color is at the top of the bar, the note is sharp, if at the bottom, the note is flat). The clef is selectable by pressing the clef button at the top of the plot repeatedly until the desired clef is shown. The background color theme is selectable between light or dark with the other button. If the Show Wave button is selected, small versions of the waveform are visible within the note bars. This is more useful with the plot is maximized full screen with the two finger tap feature.
When freezing this plot with double-tap, all the same zooming and timeline playback features exist as discussed in the Waveform/Pitch section above.
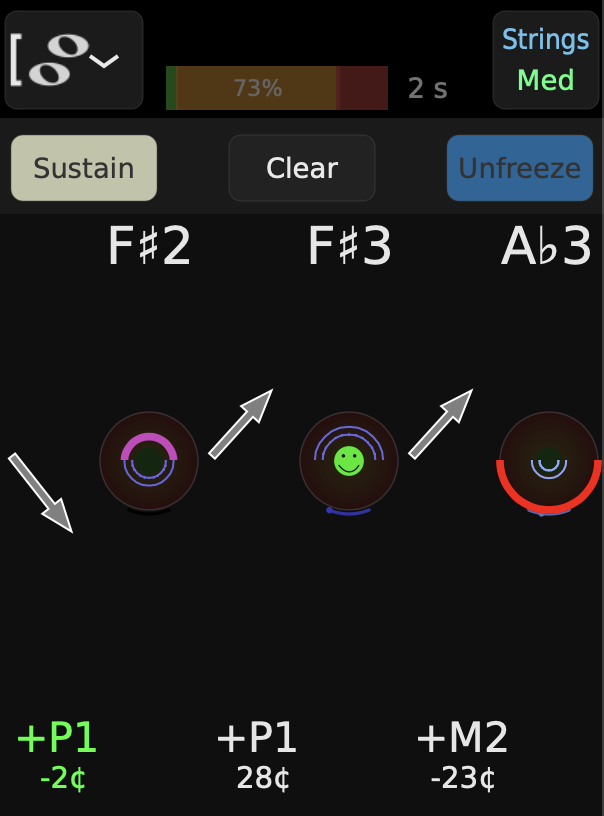
Interval Trainer
The Interval Trainer tracks your distinct notes, giving visual data to show their intonations and intervals between them. At the top of each note is its pitch. At the center, a target shows how in tune the note is. An arrow indicates the melodic direction from the previous note performed. Below the arrow, the interval is displayed as both whole tones and cents.
Tapping (and holding) an interval will play that note with your selected instrument from the TE Tone Generator (Sound Page).
3 Controls are given above the trainer:
- Sustain: Sustain the notes played by the Tone Generator.
- Clear: Clear all intervals.
- Freeze: Stops the trainer from adding new intervals. Click to unfreeze.
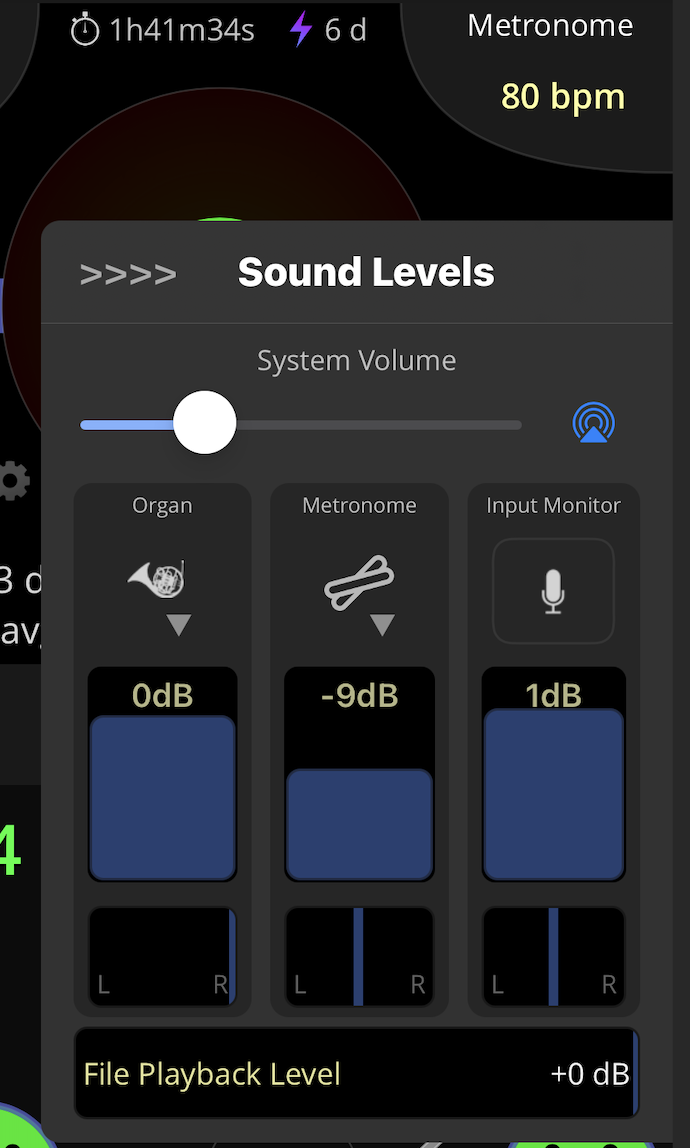
Sound Level Mixer
The Sound Level Mixer is a small mixer enabling you to control the levels and sounds of various things in the TE Tuner app.
It can be popped out from the right hand side of the screen by swiping left on the edge of the screen. A mixer icon is shown on the left to guide you.
Note: The Sound Level/Mixer Slide-out is available in portrait orientation on phones, and on iPads.
The following mixer controls are available:
- The slider at the top controls the overall system volume.
- Instrument type for playback of sounds can be changed by tapping the instrument name and choosing a new one.
- The metronome sound can be changed by tapping the Metronome icon and choosing a new sound.
- Volumes for the Instrument, Metronome and user input can be adjusted by sliding the blue bars up and down.
- To add the sound from your input/microphone to the earbuds/headphones mix along with the other application sounds, tap the input monitor so the microphone icon turns green (or blue for Desktop and Android apps).
- To pan left/right for each item in the earbuds/headphones/speaker output, slide each horizontal pan bar.
- To control File Playback volume level, use the horizontal slider at the bottom of the mixer.
Dismiss the mixer by either swiping it right again, or tapping the > > > button at the top.
TE File Recording and Playback
Files can be recorded or loaded for playback from every screen of the TonalEnergy Tuner. Audio recordings can be imported or exported.
To access the File Recording and Playback sidebar, swipe right from the upper left edge of any screen.
Audio Recording
Tap the microphone icon. Tap the red button to begin or to stop a recording. After stopping the recording, the file will automatically be named with day of the week, date and time your recording was made. To rename the file, tap Select in the lower left hand corner, then tap the desired file. Then tap the Rename button at the bottom of the page. You will be prompted to name the recording, or cancel to discard it. Tap Done.
Note: For quick playback, you can immediately playback the most recently saved recording you tapping the play button on the far left mid-page.
On the Sound pages an additional recording option for recording internal sounds is available. When the record button with the speaker icon is tapped, only internal sounds will begin recording. To stop recording, tap once. Basic exercises can be recorded in this way for later playback while you are rehearsing. This includes both internal instrument sounds and the metronome.
Record duration and total number of files is limited only by the device’s available storage space.
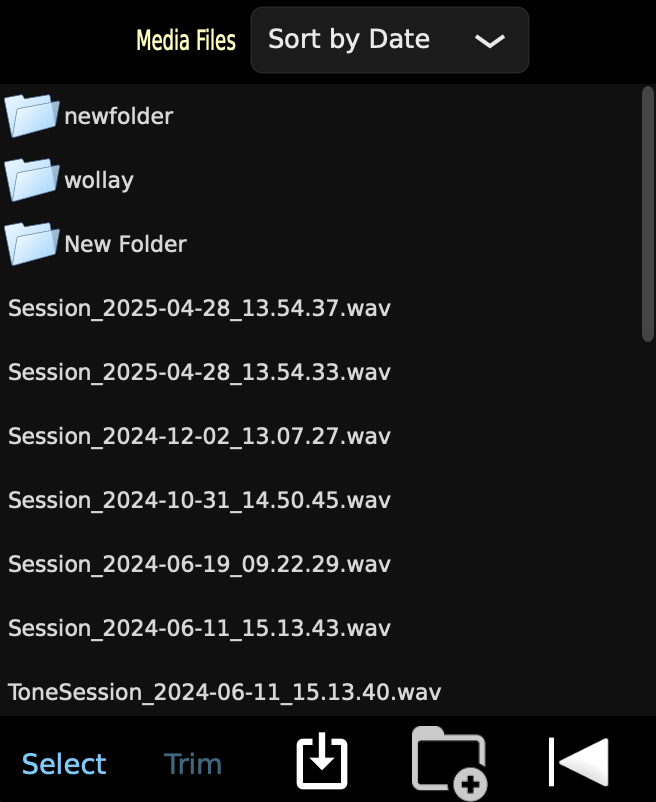
Playback
Any previously recorded or imported audio files can be loaded for playback in the TonalEnergy Tuner app. Press the file icon to bring up the My Media Files browser. Select an audio file (which can be nested in a folder) and press Play to begin playback. A file will immediately be auditioned if already playing when you select a new one so you can easily find the one you need. Tapping it again or pressing pause will stop the file auditioning. You can also select the Export button at the bottom to export the selected item in several ways. See the section later for more information about exporting (and importing) audio files. Press done or tap elsewhere (on iPad) to dismiss the file browser.
The files list can be organized by name, or date created. Press the Sort button to choose your preferred style.
The playback position can be moved by dragging on the top half of the waveform display for audio recordings.
By default the file playback will loop back to the beginning automatically when it reaches the end and continue playing. You can toggle this behavior off by selecting the loop icon button. To adjust the start or end of your loop, drag near the bottom of the waveform display to set the loop points. These can be set while the file is playing back, or when stopped. The loop points and the loop on/off state are saved with the file itself.
By default, when playing back a file the tuner is actually displaying the tuning results from the file itself and not the live microphone. If you want to instead be able to tune live input during playback, you can press the button at the bottom of the sidebar with a magnifying glass so that a microphone shows inside it. With the analyze setting set to microphone the built-in tuner is still actively listening to the microphone input so you can tune yourself even as you listen to audio playback. Using headphone/earbuds can prevent the tuner from unintentionally picking up the sound of the file playback. However, when playing back out of the internal or external speaker, if your instrument is close enough or loud enough, the tuner will likely be able to recognize you instead.
You can also see the analyzed pitch and waveform of a loaded file on the Analysis page using the Waveform or Note Staff mode. Looping range and more detailed zooming features are available there too.
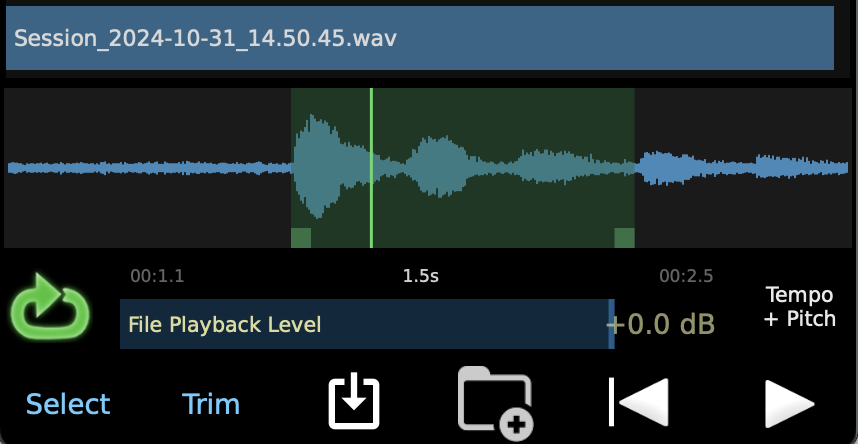
Tempo + Pitch
 You can change the playback tempo and pitch of any file using the **Tempo + Pitch** popup.
Double tap any of the speed or pitch adjust controls to reset them to the original tempo and pitch.
Tempo Adjust
For tempo (or speed of playback), a value of 0% is no change, while a value of -50% is half-speed, and a value of +100 is double speed.
This feature is useful when learning an exercise or rehearsing a musical passage. Tap the Tempo/Adjust button and slide your finger left if you want to increase the speed of the recording. Slide right if you want to slow the recording.
Pitch Adjust
There are 2 Pitch Adjust sliders.
With the first one, you can transpose the recording in half-step increments up to plus or minus one octave from the original recording.
With the second one, you can fine tune the recording up to plus or minus 50 cents in 1 cent increments.
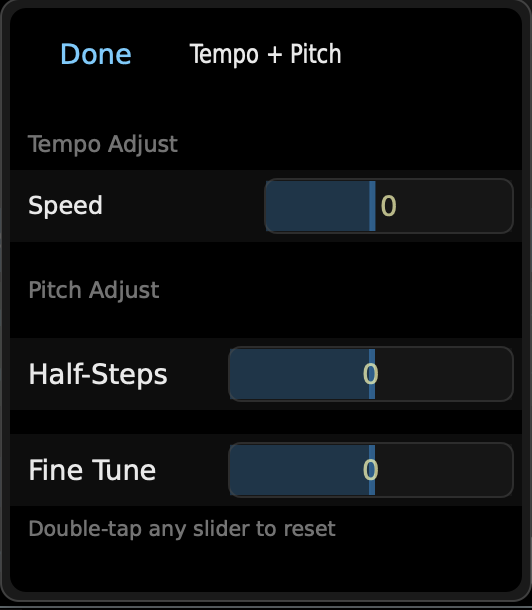
Looping

Tap the Loop icon to turn on the looping feature. Tap again and the icon will turn off the feature and the loop will turn white.
File Browsing/Selection

After pressing the folder icon to bring up the file browser, there are additional actions you can do besides selecting a file for playback.
Trimming a file

Once a file is selected, and the loop points have been adjusted away from the beginning and end of the file you have the option of Trimming the file to span only the selected range. Pressing the Trim button brings up a menu letting you select if you want to save the trimmed version to a new file (preserving the original) or replacing the original file.
Renaming

To rename a file, first press the Select button on the left side of the toolbar at the bottom of the page, then select the file you want to rename, and press Rename in the toolbar. Press Done in the lower left to return to normal.
Deleting

To delete a file you have several options. To delete a single file, simply swipe it to the left and press the Delete button exposed on the right. Or to delete multiple files at once, press the Select button on the left side of the toolbar at the bottom of the page, then select all the files you want to delete, press the trashcan icon, then confirm to delete those files.
Exporting

To export a file or multiple files together press the Select button on the left side of the toolbar at the bottom of the page. Select the items you want to export, then press the “export” button (rectangle with upward pointing arrow). A prompt will appear allowing you to export the original recordings or size compressed versions (using AAC audio encoding). Once you make that choice, a system menu will appear allowing you to choose how to export the media, including options for Email, AirDrop or sending to any installed app that is compatible with the media. If you have selected multiple files they will be stored together in a ZIP file archive for export.
Importing

Press the Import icon to import your own files.
Folders

You can organize your files into folders within the app.
Press the new folder button to create a new folder and give it a name. Selecting the folder in the list will take you there. When you are doing this from the file browser on one of the main pages of the app, the current folder you are browsing in will also be used to store any new recorded files. Press the Back to previous folder item at the top to return to the folder above. You can create folders within folders.
To move a file to a folder, press the Edit button in the corner and then drag the item by the stacked line handles on the right edge of the item. You can only drag a file to one of the folders, or to the [Back to previous] item, releasing your finger when the file is shown just under the desired destination will move it there.
TE Custom View
The custom page allows you to set up complex layouts all within a single window. The TE Custom View consists of panels that can be arranged into various configurations. The panels can be split horizontally or vertically and resized.

Click the horizontal or vertical arrows to split panels, or the X button to delete them.
Each panel can be configured to display an arbitrary view from the application. For example, you could set up a custom page that combines the target tuner in one panel and the string tuner in another.
Note: Each panel must have a minimum size, so to split more panels resizing the window may be needed.
The following views are available to add to custom view panels:
- Target Tuner
- String Tuner
- Pitch Wheel
- Pitch Grid
- Keyboard
- Analysis - Waveform/Pitch
- Analysis - Spectral
- Analysis - Harmonic
- Analysis - Note Staff
- Analysis - Interval Trainer
- Metronome
Each configuration of panels into a custom view is referred to as a layout.
Layouts can be saved, loaded, and reordered within the layout manager. The layout manager can be accessed by tapping on the Presets button within the custom page or by selecting Layout Manager from the View menu and then choosing the Custom View Presets tab.
Note: Some views within the custom page have been simplified by removing certain components. For example, views that previously had a target tuner as a secondary component now only show their primary function within custom view panels. For instance, analysis views do not include the target tuner within the custom view, as a separate target tuner can be added as its own panel.
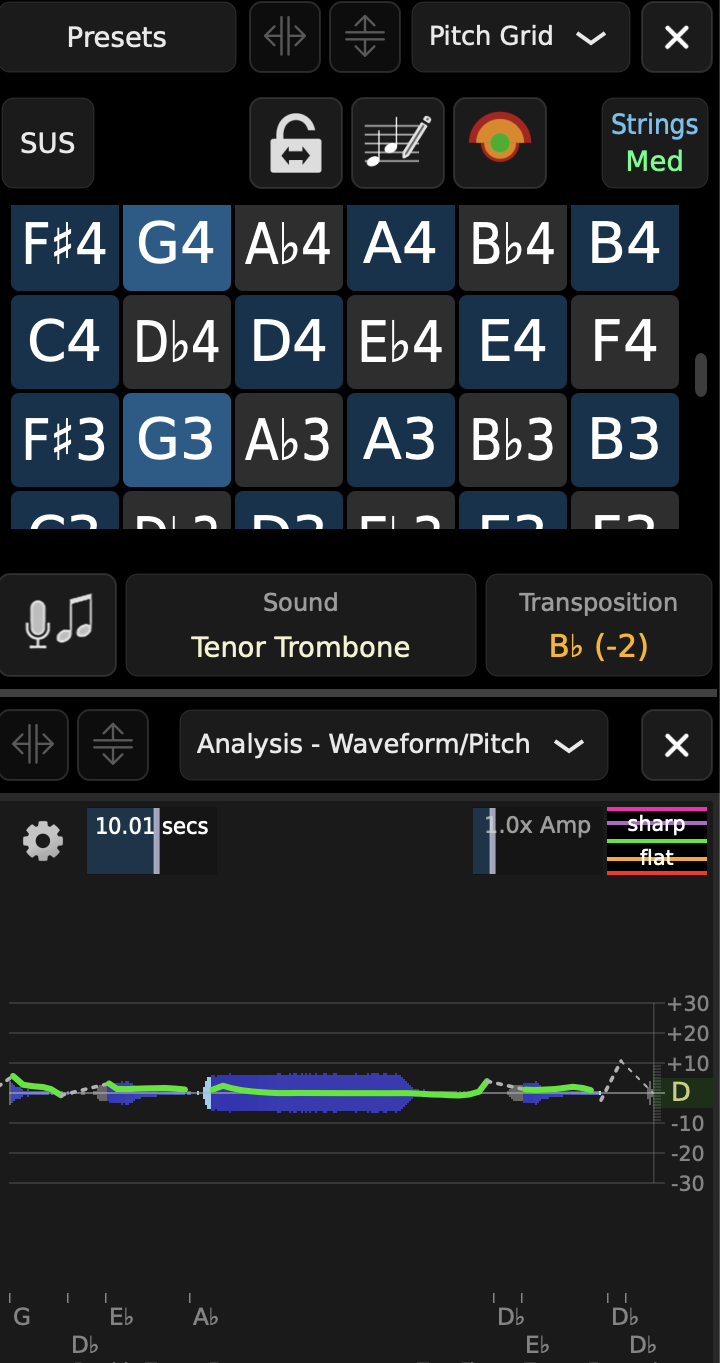
TE Preferences
Concert A Reference
You can change the Concert A Reference from 440 Hz to the reference frequency number you prefer. In order to change the number, tap the number. A keyboard will appear. Type in the new reference frequency number and tap Done. This calibration number will remain unless you change it again. There is no default.
Key / Temperament Options
Alternate Temperament
To use the alternate temperament (which is toggled via the temperament button on the Tuner and Tone Generator pages), select the Alternate Temperament item in the Preferences. There are many built-in options, including various historical temperaments. You can also add your own custom temperaments by hitting the New button, supplying a name, and entering the offset in cents from equal temperament for each of the 12 chromatic intervals.
Note: Perfect 5ths The TonalEnergy Tuner is set to tune the violin family using a just intonation feature when the player starts tuning his instrument beginning on the instrument’s open string.
Notation
The desired notation of the displayed note names can be selected from the Notation menu. Several variants of English notation, movable and fixed Solfège, Northern European, Indian and Japanese options are available.
Auto Transpose
This allows the tuner to transpose to the instrument key automatically as you switch instruments sounds.
Auto Octave Rounding
If you are single tapping on the Chromatic Wheel when Auto Octave Rounding is off, the same octave will repeat. If you toggle Auto Octave Rounding on and single tap, the octave will go up every time you touch and go past C.
Note: If you are using the slide technique (instead of single tap) on the Chromatic Wheel, the octave will progress every time you pass C.
Auto Key Detect
This option enables recognition of the root key of any triads played together in the tone generator page. The three notes can either be pressed at the same time, or constructed one at a time with the Sustain feature on. The root key is used by alternate temperaments such as Just/Pure as the basis for the interval relationships between the notes.
Note Double-Tap Changes Key
When this option is enabled, the key center can be changed by double-tapping a note on the Target Tuner’s Pitch Wheel or any of the Sound Page interfaces. If it is disabled, double-tapping will just play the notes twice quickly.
Changing Key Shifts Drones
When changing key, any drones playing will also be shifted if this option is enabled.
Temperament Button Tap
Changes the behavior of the Temperament Button in the top left corner of the screen.
The two options are:
- Show the options popup.
- Quickly switch between Equal and your selected Just or Alternative Temperament.
Streaks and Activity
Show Streaks
- How often you’d like TE Tuner to open with the Streaks Page.
Choices are: - Every Launch - Once a Day - Once a Week - Never
View Streaks
Tapping takes you directly to the Streaks page.
Show All Activity
Tapping takes you directly to the Activity page.
Enable Visible Touches
When this option is enabled, touches to the TE Tuner views will be highlighted. This is useful for demonstration videos.
General Options
Show Cents Display enables the cents text display on all the pages that have it.
Show Note Name enables the note name display on all the pages that have it.
Show Tuner Wheel enables the chromatic note wheel to be overlaid on the target tuner page.
Show % In-Tune Bar enables the Pitch Tracker to be shown on the Target Tuner, Sound and Analysis pages.
Show Session Time turns off the Session Time and Daily Streak visual display at the top of each Tuning and Sound page.
Show Smiling Face enables showing the smiling face when holding a tone in very good tune.
Show Smile Surprise shows extended in-tune playing of pitches.
Show Out-of-Tune Face enables showing the purple “question” face when the pitch is very out of tune.
Analysis Options
The Analyze File Playback option, when enabled will do realtime analysis of any file currently being played back, and will not use the microphone input at that time. If you want to play back a file, but still be able to use the tuner with live microphone input, disable this option.
The Filled Spectral Plot option draws the spectral plot with a solid filled-in style, instead of the default line style.
Show 1/10 Cents toggles off the use of the decimal tenths of a cent on those labels within the app. This is particularly helpful with all voice students and beginning wind and string players.
Reset Statistics WARNING This will clear the usage activity database and you will LOSE ALL YOUR HISTORY permanently! Please note this cannot be undone.
Clear Cached Peaks WARNING Clearing Cached Peaks will get rid of all the waveform info for recorded files and regenerate them.
Audio Options
Audio Device Options: Set your Audio Device and its settings here.
Input Channel: If you have a stereo input connected you can choose what channel you want the tuner to listen to.
Instrument Level Slider: Slide to your desired instrument volume. This is especially helpful when balancing the volume of the instrument with the volume of the metronome sounds.
Reverb Room Size adjusts the apparent largeness of the reverberating space, from small and subtle to large and cavernous. The Level setting controls the amount of reverb mixed with the direct instrument sound.
Note: All of the TonalEnergy Instruments are preset to the following specifications: Room size 40% Level 15%
You may want to change the settings to enhance the internal sounds. The size of the room, the outdoor environment, and the quality of headphones or speakers will greatly affect the quality of the instrument sounds.
The Auto vibrato feature on the tone generation page uses the following settings to guide how the vibrato sounds. You can set a Start Delay to delay the onset of the vibrato after first tapping the note by a given number of (fractional) seconds. The Depth control will adjust how strong the vibrato is, and the Rate adjusts how quick it is. The Auto-adjust with pitch option is recommended because it will automatically scale the depth and rate of the vibrato naturally as the pitch of the instrument varies. Using the Auto Vibrato feature can demonstrate how different vibrato styles can sound on the varying instruments. The vibrato options can be restored to their factory defaults with the Reset to Default item.
Bluetooth Silence Level If you are using a Bluetooth speaker and the metronome cannot be heard, but the tone generation can be, slowly start raising the value of the Bluetooth silence level slider until the metronome suddenly comes out at normal volume. It adds a quiet white noise to the output so the speaker doesn’t think it is silent between metronome beats.
Metronome Options
A variety of Metronome Options can be edited here. For more information on these, please check the Metronome Options section in the Metronome documentation.
Remote Control Commands
Various features can be remotely controlled by using keyboards or external MIDI devices. The list of the available commands can be found here, and by selecting each you can assign specific events to be used to trigger them. More than one event can trigger the same command, and you create a new trigger by tapping on the command and selecting Learn New Trigger. It will listen to incoming keyboard or MIDI events and add them to the current list. Triggers can also be deleted by selecting them and tapping *Delete Selected Triggers.
MIDI Settings
Selecting MIDI settings brings you to a comprehensive page on controlling how MIDI events are sent and/or received from the app. MIDI support allows you to control the internal instruments via any MIDI controller. Furthermore, using the touch interface on the Tone Generator page can also send MIDI out, including any subtle pitch bends necessary to support a selected alternative temperament. The pitch bend range is currently fixed to the standard +/-2 semitones.
IN and OUT CHANNEL – set the MIDI channel that the app will respond to on input (or Omni for any), and the channel that will be used to output MIDI notes when notes are played in the app.
Using APP TRANSPOSE will cause incoming MIDI notes to be transposed with the value set in the app.
ALLOW EXTERNAL PITCH BEND enables MIDI pitch bend to affect the TE Tone Generator.
USE NOTE VELOCITY When enabled, external MIDI notes velocity will be used by the Tone Generator. Otherwise all notes will be played at default volume.
INPUT CONNECTIONS – Choose what MIDI hardware devices, network MIDI connections, or other running applications with virtual MIDI ports you want to accept MIDI input from. You can choose to receive MIDI note messages (notes, controller, pitch-bend etc) that will play the current instrument, or to receive synchronization clock messages from the source, or both. If you are connecting to another application’s ports, only do so in one of the applications, not both, or duplicate events may be received. You must select a device here if you want to use the remote control commands feature with MIDI PC or CC events as well.
OUTPUT CONNECTIONS – Choose what MIDI hardware devices, network MIDI connections, or other running applications with virtual MIDI ports you want to send MIDI events to. You can choose to send MIDI note messages (notes, controller, etc) that are played on the solo pads, or to send synchronization clock messages to that destination, or both. If you are connecting to another application’s ports, only do so in one of the applications, not both, or duplicate events may be processed.
VIRTUAL MIDI - Allow Connections, If enabled, virtual MIDI ports will be created so that applications are able to send or connect to us on their end. You can still send and receive MIDI using the input and output connections shown above if this is off. Separate control to enable the sending of MIDI Clock events out of our virtual midi port.
WIRELESS MIDI – Connect Bluetooth MIDI device.
Browse Recordings
This feature allows access to all audio files, identical to the interface found in the Recording Sidebar.
Language
Allows you to choose a specific language translation from the available list. By default it will show the system default language if it is available, but you can override that choice here if you want to see the app in a different language.
Other Resources
Here you’ll find options to contact us, or find more info on the TE Tuner and its development team.
Reset to Factory Default Options
This resets all options to their original default values. A confirmation will appear, as this action cannot be undone.
Updates
Toggle check for updates on startup, or check for an update now.